lerobot录制
简介
lerobot record是关键核心流程,其包括了数据的采集和模型推理两部分。
如果是数据采集模式,命令启动如下
python -m lerobot.record \
    --robot.disable_torque_on_disconnect=true \
    --robot.type=so101_follower \
    --robot.port=/dev/ttyACM0 \
    --robot.id=R12252801 \
    --robot.cameras="{ handeye: {type: opencv, index_or_path: 6, width: 640, height: 480, fps: 30}, fixed: {type: opencv, index_or_path: 0, width: 640, height: 480, fps: 30}}" \
    --teleop.type=so101_leader \
    --teleop.port=/dev/ttyACM1 \
    --teleop.id=R07252608 \
    --dataset.repo_id=${HF_USER}/record-07271148\
    --dataset.num_episodes=10 \
    --dataset.reset_time_s=5 \
    --dataset.push_to_hub=false \
    --dataset.single_task="Grab the cube" \
    --display_data=true
如果是模型推理模式,则命令如下:
python -m lerobot.record  \
  --robot.type=so101_follower \
  --robot.disable_torque_on_disconnect=true \
  --robot.port=/dev/ttyACM0 \
--robot.cameras="{ handeye: {type: opencv, index_or_path: 6, width: 640, height: 480, fps: 30}, fixed: {type: opencv, index_or_path: 0, width: 640, height: 480, fps: 30}}" \
  --robot.id=R12252801 \
  --display_data=false \
  --dataset.single_task="Put brick into the box" \
  --policy.path=outputs/weigh_07280842/pretrained_model \
  --dataset.episode_time_s=240  \
  --dataset.repo_id=${HF_USER}/eval_so101_07271148


默认录制时长是60s,60S后会停止,如果要改长加上--dataset.episode_time_s=640
主要的区别是如果是采集模式需要使用–teleop参数启动遥控机器,如果是模型推理模式则不需要启动遥控机器,但是需要指定模型路径–policy.path,本质上就是机器人的动作指令来源于哪里,要么来之遥控器的,要么来自模型推理出来的。
在阅读本文前,这里先做一个总结:
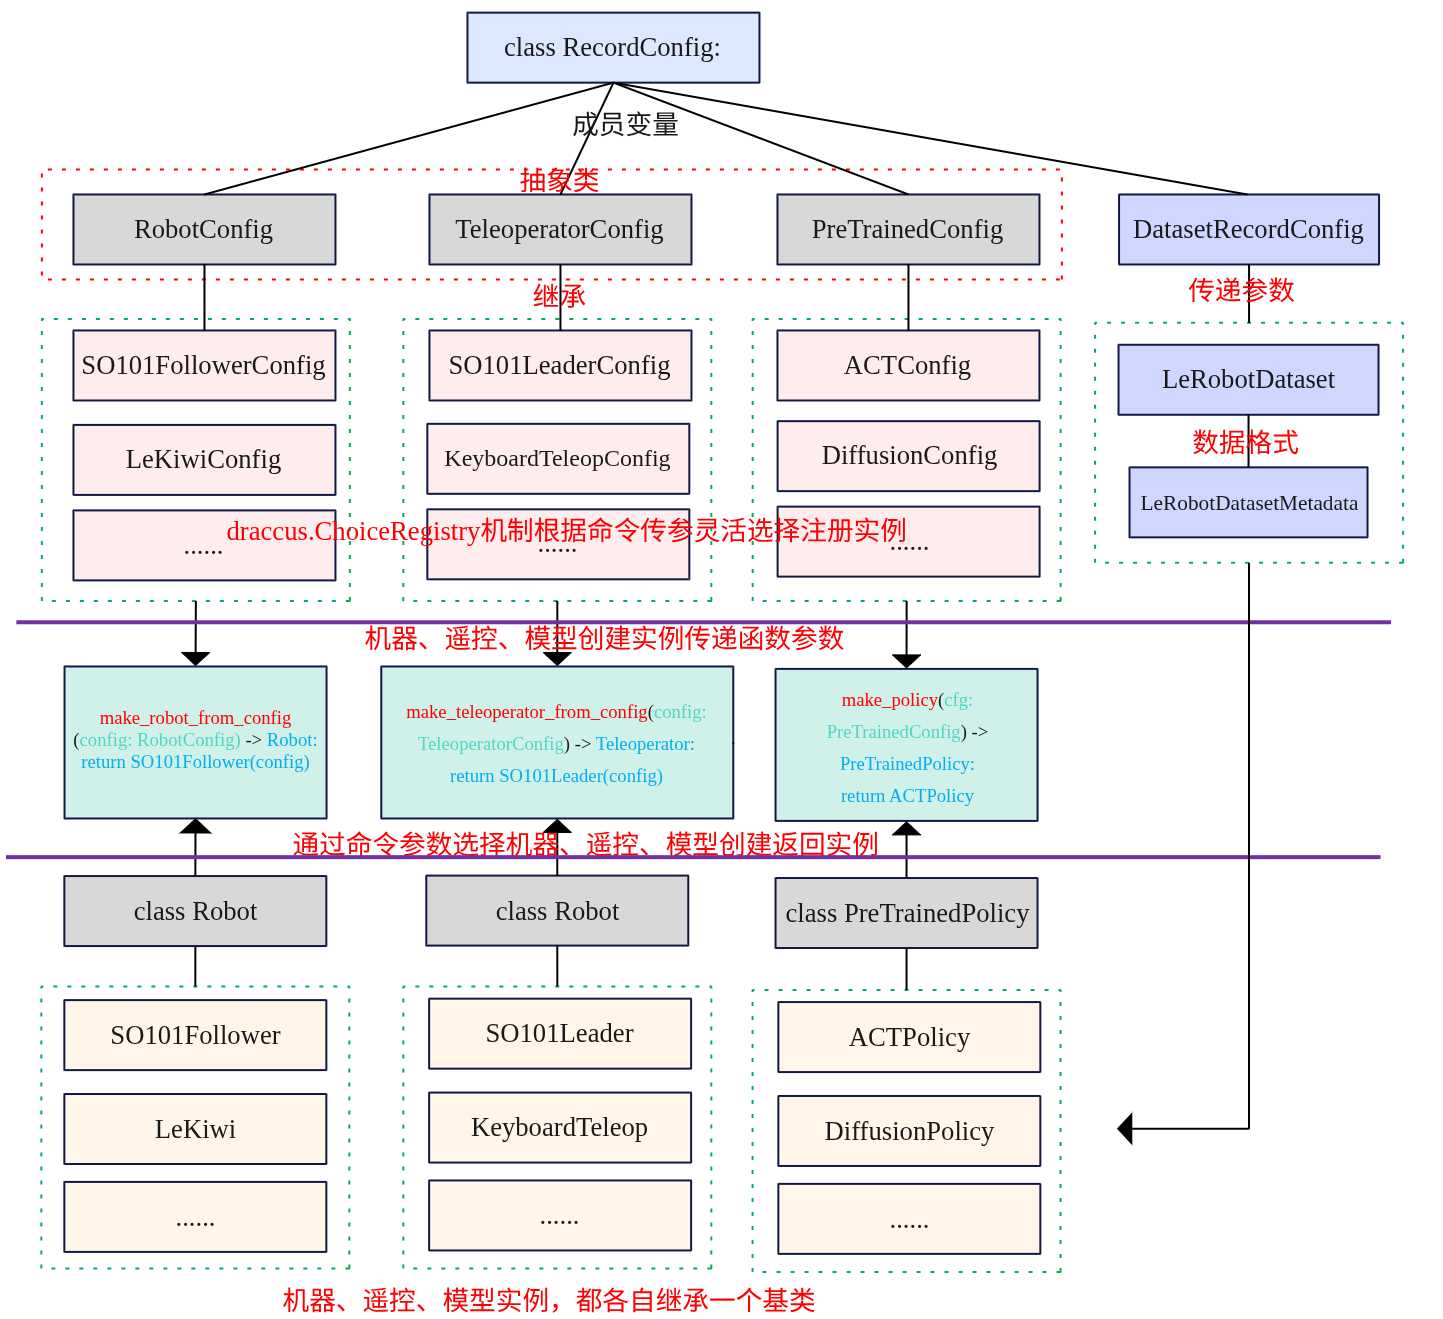
从上图可以看出整个录制流程主要围绕机器设备、遥控设备、模型、数据集四个要素进行展开。
- 机器:有SO101Follower、LeKiwi等机器,都继承Robot类。通过命令行参数robot.type调用make_robot_from_config函数选择创建具体的实例设备,函数返回的还是Robot但是指向的是具体的机器实例如SO101Follower,利用了多态的特性做到了解耦,如果要新添机器时,只需要参考SO101Follower添加一个新的设备即可。在创建机器实例时传递RobotConfig参数,这个参数依旧是抽象基类,其继承了draccus.ChoiceRregistry,通过命令行参数robot.type选择注册具体的配置如SO101FollowerConfig。
- 遥控:用于控制机器,常用于数据的采集。这里同样通过命令行参数teleop.type调用make_teleoperator_from_config函数选择创建具体的设备实例,创建实例时需要传递TeleoperatorConfig参数,其也是一个抽象基类,基于命令选择注册实例化的配置类参数,如SO101LeaderConfig。
- 模型:模型用于决策推理动作,其和遥控二选一,如果指定了遥控了,模型就不需要指定了。通用使用了机器、遥控的解耦机制,具体的实例化为ACT或DiffusionPolicy等。
- 数据:通过参数dataset.xxx将参数构建为DataRecordConfig类,然后将其中的信息传递给LeRobotDataset。
lerobot的整个代码框架将具体的设备、配置、模型等做到了解耦,方便拓展新的设备,其设计思想值得借鉴。下面本文将先按照执行命令启动流程可以分为参数解析、硬件设备初始化与连接、数据集初始化、采集循环、数据保存等几个阶段,接下来将按照这几个阶段进行介绍。
关键配置类
在介绍关键流程时,先来总结一下关键record流程需要的配置类数据结构,这些Config类主要用于机器、遥控、模型实例化传递的参数。
RecordConfig
RecordConfig是整个record入口函数的传递参数,其通过命令行的参数构建形成RecordConfig对象传递给函数。
class RecordConfig:
    # 1. 核心以来配置
    # 机器人硬件配置如型号、端口、相机参数等,有RobotConfig类定义
    # 如s101_folloer的通信端口、关节限制等,必现通过命令行或代码显式传入。
    robot: RobotConfig
    #数据集录制配置,如repo_id,num_episodes、fpsdeng,必现显式传入。
    dataset: DatasetRecordConfig
    # 2.控制方式配置(可选)
    # 遥控操作器配置,如So100_leader,可选。
    teleop: TeleoperatorConfig | None = None
    # 预训练策略配置,如模型路径、推理设备等。
    policy: PreTrainedConfig | None = None

    #3. UI与反馈配置(可选)
    # 是否实时显示相机画面,通过rerun可视化工具
    display_data: bool = False
    # 是否启用语音合成反馈,人机的提示声,默认开启。
    play_sounds: bool = True
    # 是否从现有数据集续录
    resume: bool = False

    def __post_init__(self):
        # 如果指定了policy,则进行加载模型
        policy_path = parser.get_path_arg("policy")
        if policy_path:
            cli_overrides = parser.get_cli_overrides("policy")
            self.policy = PreTrainedConfig.from_pretrained(policy_path, cli_overrides=cli_overrides)
            self.policy.pretrained_path = policy_path
         # teleop和policy必须要指定一个
        if self.teleop is None and self.policy is None:
            raise ValueError("Choose a policy, a teleoperator or both to control the robot")

    @classmethod
    def __get_path_fields__(cls) -> list[str]:
        """This enables the parser to load config from the policy using `--policy.path=local/dir`"""
        return ["policy"]
RecordConfig中有几个关键的成员,分别是RobotConfig,DatasetRrcordConfig、TeleoperatorConfig、PreTrainedConfig。其中除了DatasetRrcordConfig外的其他几个都是继承draccus.ChoiceRegistry 和 abc.ABC,是一个抽象基类,需通过注册的子类(如特定机器人型号的配置类)实例化,种设计既保证了配置的结构化(继承 abc.ABC),又支持灵活的子类选择(通过 draccus.ChoiceRegistry 实现配置注册与解析)。
- RobotConfig 控制硬件接口,确保机器人正确连接和数据采集;
- DatasetRecordConfig 控制数据存储,定义数据集格式和元信息;
- TeleoperatorConfig 和 PreTrainedConfig 控制机器人行为,分别对应手动和自动控制模式。
RobotConfig
#标记为数据类,所有字段必现通过关键参数传入,自动生成__init__等方法
@dataclass(kw_only=True)
#继承draccus框架选择注册机制,允许子类如SO100FollowerConfig、KochFollowerConfig
#作为可选机器人型号注册,支持通过配置文件或命令行参数
#动态选择例如--robot.type=s101_follower
#abc.ABC抽象基类,不可直接实例化,必现通过子类具体机器人型号配置使用。
class RobotConfig(draccus.ChoiceRegistry, abc.ABC):
    # 机器的唯一标识实例
    id: str | None = None
    # 标定文件存储目录
    calibration_dir: Path | None = None

    #是 dataclass 的初始化后钩子,用于补充参数校验逻辑,确保机器人配置的合法性。
    #主要是检查cameras中的宽高、帧率等。
    def __post_init__(self):
        if hasattr(self, "cameras") and self.cameras:
            for _, config in self.cameras.items():
                for attr in ["width", "height", "fps"]:
                    if getattr(config, attr) is None:
                        raise ValueError(
                            f"Specifying '{attr}' is required for the camera to be used in a robot"
                        )
    #通过 draccus.ChoiceRegistry 的 get_choice_name 方法,动态返回子类的注册名称(即机器人型号)。
    @property
    def type(self) -> str:
        return self.get_choice_name(self.__class__)
RobotConfig 是抽象基类(ABC),仅定义所有机器共有的通用配置字段,如id、calibration_dir。其继承了draccus.ChoiceRegistry实现了不同机器人型号的动态注册与选择。
下面以一个继承实例说明
@RobotConfig.register_subclass("so101_follower")
@dataclass
class SO101FollowerConfig(RobotConfig):
    # 机器的通信端口,如/dev/ttyACM0,通过--robot.port命令传入
    port: str
    # 断开连接时是否关闭电机扭矩,通过命令--robot.disable_torque_on_disconnect
    disable_torque_on_disconnect: bool = True
    # 电机相对位置目标安全上限,防止运动幅度过大。
    max_relative_target: int | None = None

    # 相机的配置通过字典的方式。
    cameras: dict[str, CameraConfig] = field(default_factory=dict)
    #--robot.cameras="{ handeye: {type: opencv, index_or_path: 6, width: 640, height: 480, fps: 30}, fixed: {type: opencv, index_or_path: 0, width: 640, height: 480, fps: 30}}

    # 是否使用角度制而非弧度制
    use_degrees: bool = False
这是框架自定义的子类注册装饰器,作用是将 SO101FollowerConfig 类与字符串 so101_follower 绑定,使其成为 RobotConfig 的可选型号。装饰器内部会将 SO101FollowerConfig 类添加到 RobotConfig 的“子类注册表”中,键为 so101_follower,值为类本身。当用户通过命令行传入 –robot.type=so101_follower 时,框架会从注册表中查找并实例化该类。
总结一下,RobotConfig是机器的硬件配置,但是其是一个虚拟基类,其具体实例的机器型号通过子类继承RobotConfig,有很多型号的子类,其巧妙的使用了draccus.ChoiceRegistry注册机制(RobotConfig继承),通过参数–robot.type来指定具体实例化的设备。同时这里也使用了多态的特性,通过统一的RobotConfig接口操作不同实例的具体实现,如通过 robot.type 属性(基类定义),可以动态判断具体子类类型,并执行对应逻辑。
if cfg.robot.type == "so101_follower":  # 通过基类接口获取子类类型
    print(f"SO101 特有端口: {cfg.robot.port}")  # 访问子类特有属性
elif cfg.robot.type == "so100_follower":
    print(f"SO100 特有IP: {cfg.robot.ip_address}")  # 另一子类的特有属性
DatasetRecordConfig
class DatasetRecordConfig:
    #1. 数据集标识与存储
    #数据集唯一标识符,格式为 '{hf_username}/{dataset_name}' (e.g. `lerobot/test`),用于定位hugging Face Hub仓库或本地路径
    repo_id: str
   #录制任务的文字描述,用于标注数据用途。
    single_task: str
    # 数据集本地存储根目录,如果未指定使用~/.cache/huggingface/datasets
    root: str | Path | None = None

    # 2.录制控制参数
    # 录制的帧率,控制数据采集帧率。
    fps: int = 30
    # 单段录制时长,默认60S
    episode_time_s: int | float = 60
    # 重置环境时长,两端录制之间预留环境重置时间。
    reset_time_s: int | float = 60
    # 总录制段数,控制数据集包含样本数量(如50段*60S=3000S总数据)
    num_episodes: int = 50

    #3. 数据处理与上传
    # 是否将录制图像帧编码为视频文件,默认开启
    video: bool = True
    # 是否上传数据集到hugging Face Hub,默认自动上传。
    push_to_hub: bool = True
    # Hub仓库是否设置为私有,默认是公开
    private: bool = False
    # 上传到hub上的数据集标签
    tags: list[str] | None = None

    #4. 图像存储性能参数
    #图像写入的线程数
    num_image_writer_processes: int = 0
    #每个相机图像写入的线程数
    num_image_writer_threads_per_camera: int = 4

    def __post_init__(self):
        if self.single_task is None:
            raise ValueError("You need to provide a task as argument in `single_task`.")
    #__post_init__ 是 dataclass 的初始化后钩子方法,在 __init__ 初始化所有字段后自动执行,
    # 用于补充校验逻辑。
    # 确保 single_task 字段不为空。因为 single_task 是描述录制任务的核心元数据(无默认值且必选),
    # 若未提供则直接抛出错误,避免后续数据标注缺失关键信息。
DatasetRecordConfig 是数据集录制任务的参数容器,被嵌套在 RecordConfig 中(作为 RecordConfig.dataset 字段),最终通过 parser.wrap() 装饰器从命令行参数解析生成实例。
例如,用户通过命令行指定:
--dataset.repo_id=aliberts/record-test --dataset.num_episodes=2 --dataset.single_task="Grab the cube"
这些参数会被解析为 DatasetRecordConfig 实例,其字段值(如 num_episodes=2)直接控制录制逻辑(如 record_loop 函数的循环次数)。
TeleoperatorConfig
@dataclass(kw_only=True)
class TeleoperatorConfig(draccus.ChoiceRegistry, abc.ABC):
    # Allows to distinguish between different teleoperators of the same type
    id: str | None = None
    # Directory to store calibration file
    calibration_dir: Path | None = None

    @property
    def type(self) -> str:
        return self.get_choice_name(self.__class__)
TeleoperatorConfig 是远程遥控操作器(如手柄、键盘、 leader 机器人)的抽象配置基类,用于定义所有遥操作器共有的通用配置字段和动态选择机制。它与RobotConfig类似,同样继承了draccus.ChoiceRegistry 实现了注册机制,其具体的子类又继承TeleoperatorConfig。
@TeleoperatorConfig.register_subclass("so101_leader")
@dataclass
class SO101LeaderConfig(TeleoperatorConfig):
    # Port to connect to the arm
    port: str

    use_degrees: bool = False
用户通过-teleop.type指定来实例化具体的操作设备,如–teleop.type=so101_leader时,具体的流程如下。
- 框架通过 draccus.ChoiceRegistry 查找注册名称为 so101_leader 的子类(如 SO101LeaderConfig);
- 实例化该子类,接收命令行参数(如 –teleop.port=/dev/ttyACM0)并初始化特有字段(如 port);
- 最终通过 TeleoperatorConfig 基类引用(如 cfg.teleop)传入 make_teleoperator_from_config 函数,创建具体遥操作器实例。
PreTrainedConfig
@dataclass
class PreTrainedConfig(draccus.ChoiceRegistry, HubMixin, abc.ABC):
    #1. 观测与特征配置
    # 策略输入的观测部署,如=2表示输入当前+前1步观测
    n_obs_steps: int = 1
    #特征归一化模式映射{"image":"mead_std"}
    normalization_mapping: dict[str, NormalizationMode] = field(default_factory=dict)
   #输入特征的规范{"image": PolicyFeature(type=VISUAL, shape=(3, 224, 224))})
    input_features: dict[str, PolicyFeature] = field(default_factory=dict)
    #输出特征规范输出特征规范(定义策略输出的特征类型,如 {"action": PolicyFeature(type=ACTION, shape=(6,))})
    output_features: dict[str, PolicyFeature] = field(default_factory=dict)

    #2. 设备与性能配置
    # 策略运行设备如是否使用cuda或cpu
    device: str | None = None  # cuda | cpu | mp
    #是否启用自动混合精度训练
    use_amp: bool = False

    #3. hugging face Hub继承
    #是否将配置上传到Hub
    push_to_hub: bool = False
    #Hub的id
    repo_id: str | None = None
    # 仓库是否私有
    private: bool | None = None
    # 仓库的标签
    tags: list[str] | None = None
    # Add tags to your policy on the hub.
    license: str | None = None

    #方法在__init__后执行,处理运行设备选择和AMP的可用性
    def __post_init__(self):
        self.pretrained_path = None
        #自动选择可用设备,如果用户指定的设备不可用。
        if not self.device or not is_torch_device_available(self.device):
            auto_device = auto_select_torch_device()
            logging.warning(f"Device '{self.device}' is not available. Switching to '{auto_device}'.")
            self.device = auto_device.type

        #自动禁用不支持AMP
        if self.use_amp and not is_amp_available(self.device):
            logging.warning(
                f"Automatic Mixed Precision (amp) is not available on device '{self.device}'. Deactivating AMP."
            )
            self.use_amp = False

    #通过 draccus.ChoiceRegistry 的 get_choice_name 方法,返回子类注册的策略型号名称(如 sac、tdmpc),用于日志打印和策略选择逻辑
    @property
    def type(self) -> str:
        return self.get_choice_name(self.__class__)


    #抽象方法
    observation_delta_indices:返回观测特征的差分索引
    action_delta_indices : 返回动作特征的差分索引
    reward_delta_indices : 返回奖励特征的差分索引
    et_optimizer_preset() : 返回优化器配置
    get_scheduler_preset() : 返回学习率调度器配置(如 CosineAnnealing)。
    validate_features() :校验 input_features 和 output_features 的合法性(如形状匹配)

    #将策略配置实例(含超参数、特征规范、设备设置等)序列化
    #为标准 JSON 文件 config.json,存储到指定目录。这是策略配
    #置上传到 Hugging Face Hub 的前置步骤——Hub 要求模型/配
    #置必须包含 config.json 以描述其参数,而 _save_pretrained 正
    #是生成该文件的标准化实现。例如,当调用
    #config.push_to_hub() 时,框架会先调用 _save_pretrained 将
    #配置保存到临时目录,再将该目录上传到 Hub,最终用户可通
    #过 PreTrainedConfig.from_pretrained("repo_id") 加载此 JSON
    #配置。
    def _save_pretrained(self, save_directory: Path) -> None:
        with open(save_directory / CONFIG_NAME, "w") as f, draccus.config_type("json"):
            draccus.dump(self, f, indent=4)
    #from_pretrained 是 PreTrainedConfig 的 核心类方法,用于从
    #本地目录 或 Hugging Face Hub 加载预训练策略的配置文件
    #(config.json),并实例化为具体的配置对象(如 SACConfig、
    #TDMPCConfig)。它是策略配置“复用与共享”的入口,支持通过
    #命令行参数覆盖配置,实现灵活的参数调整。
    @classmethod
    def from_pretrained(
        cls: Type[T],
        pretrained_name_or_path: str | Path,
        *,
        force_download: bool = False,
        resume_download: bool = None,
        proxies: dict | None = None,
        token: str | bool | None = None,
        cache_dir: str | Path | None = None,
        local_files_only: bool = False,
        revision: str | None = None,
        **policy_kwargs,
    ) -> T:
        model_id = str(pretrained_name_or_path)
        config_file: str | None = None
        #从本地目录加载
        if Path(model_id).is_dir():
            if CONFIG_NAME in os.listdir(model_id):
                config_file = os.path.join(model_id, CONFIG_NAME)
            else:
                print(f"{CONFIG_NAME} not found in {Path(model_id).resolve()}")
        #从hugging face hub下载
        else:
            try:
                config_file = hf_hub_download(
                    repo_id=model_id,
                    filename=CONFIG_NAME,
                    revision=revision,
                    cache_dir=cache_dir,
                    force_download=force_download,
                    proxies=proxies,
                    resume_download=resume_download,
                    token=token,
                    local_files_only=local_files_only,
                )
            except HfHubHTTPError as e:
                raise FileNotFoundError(
                    f"{CONFIG_NAME} not found on the HuggingFace Hub in {model_id}"
                ) from e

        # HACK: this is very ugly, ideally we'd like to be able to do that natively with draccus
        # something like --policy.path (in addition to --policy.type)
        cli_overrides = policy_kwargs.pop("cli_overrides", [])
        with draccus.config_type("json"):
            return draccus.parse(cls, config_file, args=cli_overrides)
PreTrainedConfig是所有策略模型如ACT,TDMPC的抽象配置类,定义了策略训练/推理所需的通用参数,特征规范、设备配置及Hugging Face Hub交互机制。它通过 dataclass、draccus.ChoiceRegistry 和 abc.ABC 实现“配置标准化”“多策略兼容”和“Hub 集成”,是策略初始化的核心参数载体。
- draccus.ChoiceRegistry:通用跟前面的RobotConfig类似,支持动态子类注册,允许子类(如 SACConfig、TDMPCConfig)作为“策略选项”注册,支持通过 –policy.type=sac 动态选择。
- HubMixin:Hugging Face Hub 交互混入类,提供 from_pretrained(从 Hub/本地加载配置)和 _save_pretrained(保存配置到 Hub/本地)方法,实现策略配置的共享与复用。
- abc.ABC:抽象基类,包含未实现的抽象方法(如 get_optimizer_preset),强制子类必须实现核心逻辑,确保策略配置的完整性。
参数解析
输入的参数会draccus 解析器读取所有 –xxx 参数,映射到 RecordConfig 类(定义在 record.py 中),生成结构化配置对象 RecordConfig类型的cfg实例,关键的配置项如下:
- robot.type=so101_follower:指定机器人类型为 so101_follower(从动机器人)。
- teleop.type=so101_leader:指定遥操作器类型为 so101_leader(主动遥操作器)。
- dataset.num_episodes=10:采集10个回合数据。
- display_data=true:启用 Rerun 可视化工具显示摄像头画面和机器人状态。
RecordConfig的cfg实例构造是,会调用RecordConfig.post_init 检查如single_task,–teleop.type以及-policy.type必现要选择一个。因为录制要么就是验证模式,要么就是数据采集模式。验证模式就是通过大模型推理得到的动作数据,而采集模式通过遥控臂得到的数据控制设备。
硬件初始化与连接
机器人的初始化so101_follower
robot = make_robot_from_config(cfg.robot)
robot.connect()
传入的参数是cfg.robot,cfg.robot是一个基类,实际实例化为so101_follower的实例,这里使用了多态的特性。根据传入的参数–robot.port=/dev/ttyACM0 连接到机器人串口,初始化通信协议(如 ROS 或自定义串口协议)。根据 –robot.cameras 配置两个 OpenCV 摄像头。–robot.disable_torque_on_disconnect=true 确保程序退出时机器人断电,避免碰撞风险。
遥控机器初始化so101_leader
teleop = make_teleoperator_from_config(cfg.teleop) if cfg.teleop is not None else None
teleop.connect()
遥控机器初始化是可选的,如果指定了模型即是验证的方式,那么就不用启动遥控机器了,只有采集数据的时候才需要遥控机器。
总结一下,通过make_robot_from_config根据传入的robot.type创建一个机器实例,这里是class SO101Follower(Robot)。如果是采集模式还会创建一个遥控机器人实例,通过make_teleoperator_from_config生成实例class SO101Leader(Teleoperator)。
数据集创建
数据特征定义
# 动作特征->数据集动作特征
action_features = hw_to_dataset_features(robot.action_features, "action", cfg.dataset.video)
# 观测特征->数据集观测特征
obs_features = hw_to_dataset_features(robot.observation_features, "observation", cfg.dataset.video)
# 整个动作特征、观测特征
dataset_features = {**action_features, **obs_features}

    from pprint import pprint
    print("Action Features:")
    pprint(action_features)
    print("Observation Features:")
    pprint(obs_features)
    print("Dataset Features:")
    pprint(dataset_features)
数据应该长什么样? 这总的要格式要求吧? hw_to_dataset_features就是将机器硬件特征(电机位置、摄像头图像)转换为数据集特征描述,也就是说数据要按照这个格式来。格式包含数据类型dtype、形状shape等。下面根据直接打印action_features、obs_features、dataset_features的打印的结果来分别分析。
Action Features:
{
    'action': {
            'dtype': 'float32',
            'shape': (6,),
            'names': ['shoulder_pan.pos',
                      'shoulder_lift.pos',
                      'elbow_flex.pos',
                      'wrist_flex.pos',
                      'wrist_roll.pos',
                      'gripper.pos']
            }
}

Observation Features:
{
    'observation.state': {  # 机器人关节状态
        'dtype': 'float32',
        'shape': (6,),
        'names': ['shoulder_pan.pos', ..., 'gripper.pos']  # 与动作特征电机名称一致
    },
    'observation.images.handeye': {  # 手眼相机图像
        'dtype': 'video',
        'shape': (480, 640, 3),
        'names': ['height', 'width', 'channels']
    },
    'observation.images.fixed': {  # 固定视角相机图像
        'dtype': 'video',
        'shape': (480, 640, 3),
        'names': ['height', 'width', 'channels']
    }
}
动作与观测特征
生成action_features、obs_features都是调用hw_to_dataset_features函数,下面来看看这个函数的实现。
# 函数入参为3个
#  -hw_features: dict[str, type | tuple] 机器硬件特征字典,键为特征名称如关节名、摄像头名,值为特征的类型如float或图像尺寸元组(height,width,channels),注意这里的type是类型不是实际的数值
#  -prefix: str 特征前缀,用于区分数据集不同的部分
#  -use_video: bool 是否将摄像头图像编码为视频
def hw_to_dataset_features(
    hw_features: dict[str, type | tuple], prefix: str, use_video: bool = True
) -> dict[str, dict]:
    features = {}
    # 1.硬件特征分类,将关节特征和图像特征分出来
    # jointfs是关键特征,通过for循环遍历hw_features.items()满足ftype为float。然后将key和ftype通过新的键值对存储到joint_fs中。
    #示例输出:{"shoulder_pan.pos": float, "shoulder_lift.pos": float, ..., "gripper.pos": float}(共6个关节)。
    joint_fts = {key: ftype for key, ftype in hw_features.items() if ftype is float}
    #cam_fs是摄像头的图像特征,值为(height, width, channels)元组。
    #示例输出:{"handeye": (480, 640, 3), "fixed": (480, 640, 3)}(两个摄像头,分辨率480×640,RGB三通道)。
    cam_fts = {key: shape for key, shape in hw_features.items() if isinstance(shape, tuple)}

    #2. 关节特征转换数值型
    #根据传入的action动作指令,构建一个新的键值对,键为action。
    if joint_fts and prefix == "action":
        features[prefix] = {
            "dtype": "float32", #统一数值类型为float32,适合模型训练
            "shape": (len(joint_fts),),#形状关键数量,如6个关键,(6,)
            "names": list(joint_fts),#关节名称列表,与机人电机意义对应
        }

    #3. 观测装特特征,与前面action结构类似,只是键值为observation.state
    if joint_fts and prefix == "observation":
        features[f"{prefix}.state"] = {
            "dtype": "float32",
            "shape": (len(joint_fts),),
            "names": list(joint_fts),
        }

    #4. 摄像头特征转换,为每个摄像头生成图像/视频存储特征
    for key, shape in cam_fts.items():
        features[f"{prefix}.images.{key}"] = {
            "dtype": "video" if use_video else "image", #存储类型:视频或图像
            "shape": shape, #图像尺寸(height, width, channels)
            "names": ["height", "width", "channels"],#形状维度名称
        }

    _validate_feature_names(features)
    return features
数据集的创建关键来源hw_features: dict[str, type | tuple]参数,该值来源于robot.action_features、robot.observation_features,根据参数的实例化以SO101Follower实例为例。
    @property
    def _motors_ft(self) -> dict[str, type]:
        return {f"{motor}.pos": float for motor in self.bus.motors}

    @property
    def _cameras_ft(self) -> dict[str, tuple]:
        return {
            cam: (self.config.cameras[cam].height, self.config.cameras[cam].width, 3) for cam in self.cameras
        }

    @cached_property
    def observation_features(self) -> dict[str, type | tuple]:
        return {**self._motors_ft, **self._cameras_ft}

    @cached_property
    def action_features(self) -> dict[str, type]:
        return self._motors_ft
电机位置特征结构_motors_ft定义了电机位置特征结构,描述关节运动的状态,其来源于self.bus.motors管理的电机列表,在Init中初始化,包含6个关节电机:
motors={
    "shoulder_pan": Motor(1, "sts3215", ...),  # 肩转
    "shoulder_lift": Motor(2, "sts3215", ...), # 肩抬
    "elbow_flex": Motor(3, "sts3215", ...),   # 肘弯
    "wrist_flex": Motor(4, "sts3215", ...),   # 腕弯
    "wrist_roll": Motor(5, "sts3215", ...),   # 腕转
    "gripper": Motor(6, "sts3215", ...),      # 夹爪
}
其输出格式返回字典 {电机名.pos: 数据类型},例如:
{
    "shoulder_pan.pos": float,
    "shoulder_lift.pos": float,
    ...,
    "gripper.pos": float
}
float表示电机位置是浮点数值。
摄像头图像特征定义机器人摄像头图像特征的结构,用于描述视觉传感器数据格式。来源self.cameras 是由 make_cameras_from_configs 创建的摄像头实例(如 handeye、fixed 摄像头),配置来自 self.config.cameras(包含分辨率等参数)。其输出格式为返回字典 {摄像头名: (高度, 宽度, 通道数)},例如:
{
    "handeye": (480, 640, 3),  # 480px高、640px宽、RGB三通道
    "fixed": (480, 640, 3)
}
观测特征observation_features整合了电机位置和摄像头图像特征,定义机器人完整可观测装特,提供数据集录制和策略决策。通过字典解包(**)合并 _motors_ft(电机位置)和 _cameras_ft(摄像头图像),输出示例:
{
    # 电机位置特征(来自 _motors_ft)
    "shoulder_pan.pos": float,
    "shoulder_lift.pos": float,
    ...,
    "gripper.pos": float,
    # 摄像头图像特征(来自 _cameras_ft)
    "handeye": (480, 640, 3),
    "fixed": (480, 640, 3)
}
动作特征action_features定义机器人的动作指令格式,即遥控机器人。其直接服用_motors_ft,说明动作指令就是电机目标位置。
数据集特征合并
dataset_features = {**action_features, **obs_features}
合并动作特征与观测特征,形成数据集完整存储结构,用于初始化 LeRobotDataset。确保每个时间步的记录包含「观测→动作」的完整配对,满足训练需求(如模仿学习中,观测为输入,动作为标签)。
Dataset Features:
{
    'action': {
        'dtype': 'float32',
        'shape': (6,),
        'names': [
            'shoulder_pan.pos',
            'shoulder_lift.pos',
            'elbow_flex.pos',
            'wrist_flex.pos',
            'wrist_roll.pos',
            'gripper.pos'
        ]
    },
    'observation.state': {
        'dtype': 'float32',
        'shape': (6,),
        'names': [
            'shoulder_pan.pos',
            'shoulder_lift.pos',
            'elbow_flex.pos',
            'wrist_flex.pos',
            'wrist_roll.pos',
            'gripper.pos'
        ]
    },
    'observation.images.handeye': {
        'dtype': 'video',
        'shape': (480, 640, 3),
        'names': ['height', 'width', 'channels']
    },
    'observation.images.fixed': {
        'dtype': 'video',
        'shape': (480, 640, 3),
        'names': ['height', 'width', 'channels']
    }
}
- action:是遥控操作机器(如SO101Leader)的关节位置数据
- observation.state:机器人(如S0101Follower)实时采集的关节位置数据。
- observation.images.xx:机器人实时采集的图像数据,可有多个。
创建数据集
创建数据集,是创建一个空的数据集。 传入的参数有repo_id标识了数据集的目录,root为数据集的根目录等等,具体如下阐述。
        dataset = LeRobotDataset.create(
            cfg.dataset.repo_id,
            cfg.dataset.fps,
            root=cfg.dataset.root,
            robot_type=robot.name,
            features=dataset_features,
            use_videos=cfg.dataset.video,
            image_writer_processes=cfg.dataset.num_image_writer_processes,
            image_writer_threads=cfg.dataset.num_image_writer_threads_per_camera * len(robot.cameras),
        )
- cfg.dataset.repo_id: 数据集的唯一标识,用于本地粗才能路径标识和上传hugging Face Hub上传的仓库名称
- cfg.dataset.fps:录制帧率。
- root=cfg.dataset.root:本地存储的路径,可以通过–dataset.root指定,如果没有提供,则默认使用缓存目录~/.cache/huggingface/
- robot_type=robot.name:机器的唯一标识,会写入到meta.json中。
- features=dataset_features:核心参数,数据集特征定义,由上一章节合并特征。
- use_videos=cfg.dataset.video: 图像的存储格式,true表示使用mpr格式。False保留为PNG格式,占用空间大。内部在录制结束后,通过encode_episode_videos 调用 ffmpeg 将 PNG 序列转为视频(定义于 lerobot_dataset.py).
- image_writer_processes: 图像写入的进程数量,默认0,仅使用线程即一个进程。
- image_writer_threads:图像写入的线程数,默认4线程/摄像头 × N摄像头。
LeRobotDataset.create
LeRobotDataset.create返回的是一个LeRobotDataset对象实例。
典型的LeRobotDataset本地存储为:
        .
        ├── data
        │   ├── chunk-000
        │   │   ├── episode_000000.parquet
        │   │   ├── episode_000001.parquet
        │   │   ├── episode_000002.parquet
        │   │   └── ...
        │   ├── chunk-001
        │   │   ├── episode_001000.parquet
        │   │   ├── episode_001001.parquet
        │   │   ├── episode_001002.parquet
        │   │   └── ...
        │   └── ...
        ├── meta
        │   ├── episodes.jsonl
        │   ├── info.json
        │   ├── stats.json
        │   └── tasks.jsonl
        └── videos
            ├── chunk-000
            │   ├── observation.images.laptop
            │   │   ├── episode_000000.mp4
            │   │   ├── episode_000001.mp4
            │   │   ├── episode_000002.mp4
            │   │   └── ...
            │   ├── observation.images.phone
            │   │   ├── episode_000000.mp4
            │   │   ├── episode_000001.mp4
            │   │   ├── episode_000002.mp4
            │   │   └── ...
            ├── chunk-001
            └── ...
核心属性
- meta: LeRobotDatasetMetadata类,元数据管理器,存储数据集“说明书”:特征定义(动作/观测维度)、帧率、机器人类型、任务描述等。
- repo_id: str类型,数据集唯一标识(如 lerobot/pick_cube),用于 Hugging Face Hub 定位和本地路径标识。
- root:Path,本地存储根路径(默认:~/.cache/huggingface/lerobot/{repo_id}),包含 data/(Parquet)、meta/(元数据)、videos/(视频)。
- revision: str类型,表示数据集的版本,默认代码库版本为v2.1。
- tolerance_s:float类型,时间戳校验容差,确保录制视频帧率稳定性。
- hf_dataset: Hugging Face Dataset 对象,存储非图像数据(关节位置、时间戳等),以 Parquet 格式。
- episode_data_index: dirc类型,episode 索引映射表,记录每个 episode 的起始/结束帧位置(如 {“from”: [0, 300], “to”: [299, 599]}),加速帧检索。
- delta_indices: dict类型,时间戳偏移索引(如 {“past”: [-2, -1], “future”: [1, 2]}),用于多模态数据同步(如动作与图像对齐)。
- episode_buffer: dict类型,内存缓冲区,临时存储当前录制的帧数据(如 {“action”: [], “observation.images.handeye”: [], “timestamp”: []})。
- image_writer:AsyncImageWriter,异步图像写入器(多线程/多进程),避免图像存储阻塞主控制循环(确保录制帧率稳定)。
- image_transforms:图像预处理函数(如 torchvision.transforms.Resize、Normalize),训练时动态应用于摄像头图像。
- video_backend: str类型,视频解码后端(默认 torchcodec 或 pyav),支持从 MP4 中精准提取指定时间戳的帧。
核心方法
- init: 数据集加载的入口,根据本地缓存状态完成元数据校验、数据下载(若缺失) 和时间戳同步检查,确保数据集可用。
- add_frame:逐帧添加数据到缓冲区,录制时将单帧数据(动作、观测、图像)添加到 episode_buffer,并异步写入图像(避免阻塞控制循环)。
- save_episode:写入到磁盘,录制完成一个 episode 后,将 episode_buffer 中的数据写入磁盘。包括非图像数据转换为Parquet文件存储到xxx.parquet,图像数据编码为MP4存储,元数据更新info.json,episodes.jsonl,episodes_stats.jsonl。
- getiterm:数据的加载与训练适配,实现 torch.utils.data.Dataset 接口,支持通过 DataLoader 加载数据用于训练。
- push_to_hub:将数据集(元数据、Parquet、视频)上传至 Hugging Face Hub,自动生成数据集卡片(README.md),包含特征说明、硬件兼容性和统计信息
- pull_from_repo:从 Hub 拉取指定版本的数据集,支持按 allow_patterns 筛选文件(如仅拉取元数据 meta/ 或特定 episode)。
- start_image_writer/stop_image_writer:为避免图像存储阻塞录制主循环(导致帧率波动),通过 AsyncImageWriter 启动多线程/多进程写入器。
- create:数据的新建或加载,是初始化的类方法。
@classmethod
def create(
    cls,
    repo_id: str,  # 数据集标识(用户指定)
    fps: int,  # 帧率(默认 30 FPS)
    features: dict,  # 特征定义(动作+观测,来自机器人硬件)
    root: ...,  # 本地路径
    robot_type: str,  # 机器人类型(如 "so101_follower")
    use_videos: bool = True,  # 是否编码视频(默认 True)
    image_writer_processes: int = 0,  # 图像写入进程数
    image_writer_threads: int = 4 * len(robot.cameras),  # 图像写入线程数
) -> "LeRobotDataset":
    # 1. 初始化元数据(调用 LeRobotDatasetMetadata.create)
    obj.meta = LeRobotDatasetMetadata.create(
        repo_id=repo_id, fps=fps, features=features, robot_type=robot_type, use_videos=use_videos
    )
    # 2. 启动图像写入器(异步写入)
    if image_writer_processes or image_writer_threads:
        obj.start_image_writer(image_writer_processes, image_writer_threads)
    # 3. 初始化 episode 缓冲区(内存临时存储)
    obj.episode_buffer = obj.create_episode_buffer()
    # 4. 创建空 HF Dataset(存储非图像数据)
    obj.hf_dataset = obj.create_hf_dataset()
    return obj
- 元数据驱动:通过 LeRobotDatasetMetadata.create 确保数据集特征与机器人硬件严格对齐,避免录制后因特征不匹配导致训练错误。
- 性能优化:异步图像写入器(多线程/多进程)解决了录制时 I/O 阻塞问题,保障实时控制循环的稳定性。
- 标准化存储:统一 Parquet+MP4 格式,兼容 Hugging Face Hub 生态和 PyTorch DataLoader,简化“录制-训练”流程。
LeRobotDataset.create 是一个类方法,通过 @classmethod 装饰,其核心特性是无需先实例化LeRobotDataset 类即可调用,直接通过类名 LeRobotDataset.create(…) 触发,并返回一个初始化完成的 LeRobotDataset 实例,通常用于工厂模式或单例模式的场景。
类方法(@classmethod)的第一个参数是 cls(代表类本身),因此可以直接通过类名触发,而非实例。LeRobotDataset.create 的作用正是绕开普通构造函数 init,为新建数据集执行特殊初始化逻辑(如元数据创建、目录结构搭建、异步写入器启动等),最终返回一个完整的 LeRobotDataset 实例。
LeRobotDatasetMetadata.create
在LeRobotDataset中会调用到obj.meta = LeRobotDatasetMetadata.create创建一个LeRobotDatasetMetadata对象,其核心功能是为全新数据集初始化元数据结构,包括目录创建、特征定义合并、元数据文件生成(如 meta/info.json)和硬件兼容性校验,确保后续机器人数据录制(关节状态、摄像头图像等)与存储格式严格对齐。
    @classmethod
    def create(
        cls,
        repo_id: str,
        fps: int,
        features: dict,
        robot_type: str | None = None,
        root: str | Path | None = None,
        use_videos: bool = True,
    ) -> "LeRobotDatasetMetadata":
        """Creates metadata for a LeRobotDataset."""
        obj = cls.__new__(cls)
        #创建空的 LeRobotDatasetMetadata 实例(不触发 __init__,避免加载现有元数据)
        obj.repo_id = repo_id
        # 数据集标识(如 "username/pick_cube")
        obj.root = Path(root) if root is not None else HF_LEROBOT_HOME / repo_id
        # 本地路径(默认缓存目录)
        obj.root.mkdir(parents=True, exist_ok=False)

        # TODO(aliberts, rcadene): implement sanity check for features
        # 合并用户提供的特征与默认特征(补充必选字段)
        features = {**features, **DEFAULT_FEATURES}
        _validate_feature_names(features)
        # 校验特征名称合法性(如禁止含空格、特殊字符,确保与硬件接口一致)
        obj.tasks, obj.task_to_task_index = {}, {}
        # 任务列表(如 {"pick": 0, "place": 1})及索引映射
        obj.episodes_stats, obj.stats, obj.episodes = {}, {}, {}
        # 初始化 episode 统计信息、全局统计、episode 列表
        obj.info = create_empty_dataset_info(CODEBASE_VERSION, fps, features, use_videos, robot_type)
     #生成数据集的“总说明书”(meta/info.json),包含以下关键信息
        if len(obj.video_keys) > 0 and not use_videos:
            raise ValueError()
        write_json(obj.info, obj.root / INFO_PATH)
        obj.revision = None
        return obj
LeRobotDatasetMetadata.create 是新建数据集的“元数据基石”,通过标准化目录结构、特征定义和兼容性校验,确保机器人录制数据(动作、图像、状态)的存储格式与硬件特征严格对齐。其输出的 LeRobotDatasetMetadata 实例是连接机器人硬件与数据集文件系统的核心桥梁,为后续数据录制、编码和训练加载提供统一的元信息描述。
加载数据集
加载数据集是加载已经存在的数据集,针对的场景是针对此前的录制场景接着录制,与创建数据集不同,创建数据集是从头开始,创建一个空的数据集。那么lerobot怎么进行恢复了?
前面章节无论是LeRobotDataset.create 还是LeRobotDatasetMetadata.create都会绕过类的构造函数xxx.init的运行,那么xxx.init在哪里运行了?
LeRobotDataset.init 是类的默认构造函数,仅在直接实例化 LeRobotDataset 时调用,核心场景是 恢复已有数据集的录制或加载。而 LeRobotDataset.create 是类方法,用于创建全新数据集,二者分工明确,对应不同的用户需求。接下来针对恢复的场景来说明。
当输入参数–resume=true,即在原来的数据集基础上进行。
   if cfg.resume:
       #走恢复模式
        dataset = LeRobotDataset(
            cfg.dataset.repo_id,# 数据集标识(如 "lerobot/pick_cube")
            root=cfg.dataset.root,# 本地存储路径(默认:~/.cache/huggingface/lerobot/{repo_id})
)
        )
        if hasattr(robot, "cameras") and len(robot.cameras) > 0:
            dataset.start_image_writer(
                num_processes=cfg.dataset.num_image_writer_processes,
                num_threads=cfg.dataset.num_image_writer_threads_per_camera * len(robot.cameras),
            )
        sanity_check_dataset_robot_compatibility(dataset, robot, cfg.dataset.fps, dataset_features)
    else:
        dataset = LeRobotDataset.create(......)
关键流程是实例化LeRobotDataset,触发LeRobotDataset.init 方法,LeRobotDataset类的初始化代码如下。
LeRobotDataset.init
LeRobotDataset:

def __init__(
    self,
    repo_id: str,  # 数据集标识(如 "lerobot/pick_cube")
    root: ...,  # 本地存储路径(默认:~/.cache/huggingface/lerobot/{repo_id})
    episodes: list[int] | None = None,  # 指定加载的 episode 索引(如 [0, 2, 5])
    image_transforms: Callable | None = None,  # 图像预处理(如 Resize、Normalize)
    delta_timestamps: ...,  # 时间戳偏移(用于多模态数据同步)
    tolerance_s: float = 1e-4,  # 时间戳校验容差(确保帧率稳定性)
    revision: ...,  # 数据集版本(默认代码库版本 v2.1)
    force_cache_sync: bool = False,  # 强制同步缓存(忽略本地文件,重新拉取)
    download_videos: bool = True,  # 是否下载视频文件
    video_backend: str | None = None,  # 视频解码后端(如 "pyav"、"torchcodec")
):
    # 1. 初始化基础路径与配置
    self.repo_id = repo_id
    self.root = Path(root) or HF_LEROBOT_HOME / repo_id  # 本地路径
    #没有创建的话默认就是~/.cache/huggingface/lerobot
    self.root.mkdir(exist_ok=True, parents=True)  # 创建目录(若不存在)

    # 2. 加载元数据(通过 LeRobotDatasetMetadata)
    self.meta = LeRobotDatasetMetadata(
        self.repo_id, self.root, self.revision, force_cache_sync=force_cache_sync
    )

    # 3. 加载实际数据(优先本地缓存,缺失则从 Hub 下载)
    try:
        if force_cache_sync:
            raise FileNotFoundError  # 强制同步时跳过本地缓存
        # 验证本地数据文件完整性
        assert all((self.root / fpath).is_file() for fpath in self.get_episodes_file_paths())
        self.hf_dataset = self.load_hf_dataset()  # 加载 Parquet 格式数据(非图像)
    except (AssertionError, FileNotFoundError):
        # 从 Hub 下载数据(含 Parquet 和视频文件)
        self.revision = get_safe_version(self.repo_id, self.revision)  # 校验版本合法性
        self.download_episodes(download_videos)  # 下载指定 episode 数据
        self.hf_dataset = self.load_hf_dataset()  # 重新加载数据

    # 4. 数据校验(确保时间戳与帧率匹配)
    timestamps = torch.stack(tuple(self.hf_dataset["timestamp"])).numpy()
    episode_indices = torch.stack(tuple(self.hf_dataset["episode_index"])).numpy()
    check_timestamps_sync(  # 校验每帧时间间隔是否为 1/fps ± tolerance_s
        timestamps, episode_indices, self.episode_data_index, self.fps, self.tolerance_s
    )
LeRobotDataset 类的构造函数(init 方法),其核心作用是加载已存在的机器人数据集(本地或 Hugging Face Hub),并完成元数据校验、数据完整性检查、时间戳同步等关键步骤,为后续数据访问(如训练、可视化)提供统一接口。该方法是 LeRobotDataset 类的“入口”,仅在恢复已有数据集或加载数据集用于训练时调用。
LeRobotDataset 是基于 PyTorch Dataset 的子类,专为机器人数据设计,支持两种场景:
- 加载本地已有数据集:从指定路径(root)直接读取元数据和数据文件。
- 从 Hugging Face Hub 下载数据集:若本地数据缺失,自动从 Hub 拉取并加载。
无论哪种场景,init 均确保数据集的元数据一致性(如机器人类型、帧率)、数据完整性(文件不缺失)和时间戳有效性(符合录制帧率),为下游任务(如策略训练)提供可靠数据。
LeRobotDatasetMetadata.init
在LeRobotDataset.init中实例化了self.meta = LeRobotDatasetMetadata,该类创建时会调用构造函数LeRobotDatasetMetadata.init。
lass LeRobotDatasetMetadata:
    def __init__(
        self,
        repo_id: str,
        root: str | Path | None = None,
        revision: str | None = None,
        force_cache_sync: bool = False,
    ):
        self.repo_id = repo_id # 数据集唯一标识
        self.revision = revision if revision else CODEBASE_VERSION
        # 版本(默认代码库版本)
        self.root = Path(root) if root is not None else HF_LEROBOT_HOME / repo_id
        #本地路径(默认缓存目录)
        try:
            if force_cache_sync:
                raise FileNotFoundError
            self.load_metadata()
        except (FileNotFoundError, NotADirectoryError):
            if is_valid_version(self.revision):
                self.revision = get_safe_version(self.repo_id, self.revision)

            (self.root / "meta").mkdir(exist_ok=True, parents=True)
            self.pull_from_repo(allow_patterns="meta/")
            # 加载本地元数据
            self.load_metadata()

    def load_metadata(self):
        self.info = load_info(self.root)
        check_version_compatibility(self.repo_id, self._version, CODEBASE_VERSION)
        self.tasks, self.task_to_task_index = load_tasks(self.root)
        self.episodes = load_episodes(self.root)
        if self._version < packaging.version.parse("v2.1"):
            self.stats = load_stats(self.root)
            self.episodes_stats = backward_compatible_episodes_stats(self.stats, self.episodes)
        else:
            self.episodes_stats = load_episodes_stats(self.root)
            self.stats = aggregate_stats(list(self.episodes_stats.values()))
从 self.root/meta 目录加载核心元数据文件(info.json、tasks.jsonl、episodes.jsonl 等),并校验元数据版本与当前代码库兼容性(check_version_compatibility)
录制流程
    policy = None if cfg.policy is None else make_policy(cfg.policy, ds_meta=dataset.meta)
    #如果是能了策略模型,进行实例创建
    listener, events = init_keyboard_listener()
    #初始化监听键盘事件
先判断是否指定了策略模型,如果指定了进行创建实例。同时初始化键盘监听器
recorded_episodes = 0
while recorded_episodes < cfg.dataset.num_episodes and not events["stop_recording"]:
    # 录制当前回合数据
    log_say(f"Recording episode {dataset.num_episodes}", cfg.play_sounds)  # 语音提示开始录制
    record_loop(  # 核心数据采集函数
        robot=robot,
        teleop=teleop,  # 遥操作器输入(或策略生成动作)
        policy=policy,
        dataset=dataset,  # 数据写入目标
        control_time_s=cfg.dataset.episode_time_s,  # 单回合录制时长(默认60秒)
        display_data=cfg.display_data,  # 实时可视化
    )

    # 回合间环境重置(给用户调整物体位置的时间)
    # 该阶段不写入数据,用于用户重置环境。
    if not events["stop_recording"] and (...):
        log_say("Reset the environment", cfg.play_sounds)
        record_loop(  # 重置阶段不记录数据(dataset=None)
            robot=robot,
            teleop=teleop,
            control_time_s=cfg.dataset.reset_time_s,  # 重置时长(用户指定5秒)
            dataset=None,  # 禁用数据写入
        )

    # 处理重录事件(用户按 'r' 触发)
    if events["rerecord_episode"]:
        log_say("Re-record episode", cfg.play_sounds)
        dataset.clear_episode_buffer()  # 清空当前回合无效数据
        continue  # 重新录制当前回合

    dataset.save_episode()  # 保存当前回合数据到磁盘(图像、状态、动作)
    recorded_episodes += 1  # 回合计数+1
核心是调用record_loop进行采集录制,过程中监听用户输入的键盘值处理相关逻辑如右键结束单次录制,左键重复录制,ESC退出流程。
当前回合录制结束后,继续调用record_loop只是传递的参数不一样,等待环境复位。录制完当前回合后,调用dataset.save_episode()将数据写入到磁盘中。
录制循环
record_loop函数在两种场景下被调用,主要的作用是协调机器人控制(遥操作/策略)、数据采集与存储,确保数据帧率稳定且格式符合数据集要求。
- 正常录制:按配置时长(control_time_s)录制 episode 数据,保存到数据集。
- 环境重置:录制结束后,执行一段无数据保存的控制(让用户手动重置环境)。
初始化与参数校验
# 校验数据集帧率与录制帧率一致性
if dataset is not None and dataset.fps != fps:
    raise ValueError(f"The dataset fps should be equal to requested fps ({dataset.fps} != {fps}).")

# 多遥操作器处理(如机械臂遥操作 + 键盘底盘控制)
teleop_arm = teleop_keyboard = None
if isinstance(teleop, list):
    # 分离键盘遥操作器和机械臂遥操作器
    teleop_keyboard = next((t for t in teleop if isinstance(t, KeyboardTeleop)), None)
    teleop_arm = next((t for t in teleop if isinstance(t, (SO100Leader, ...))), None)
    # 校验:仅支持 LeKiwi 机器人,且必须包含 1 个键盘遥操作器 + 1 个机械臂遥操作器
    if not (teleop_arm and teleop_keyboard and len(teleop) == 2 and robot.name == "lekiwi_client"):
        raise ValueError(...)

# 策略重置(若使用策略控制,确保初始状态一致)
if policy is not None:
    policy.reset()
首先校验一下数据集的帧率与录制帧率是否一致,如果遥控机器人有多个实例,比如主臂+键盘,一般这种组合用于lekiwi,包含一个键盘遥控操作器和1个机械臂遥控操作器。最后判断是否使用模型推理控制,如果是使用了先进行复位。
主循环控制与数据采集
timestamp = 0  #  episode 已录制时长(秒)
start_episode_t = time.perf_counter()  # 起始时间戳
while timestamp < control_time_s:
    start_loop_t = time.perf_counter()  # 本轮循环起始时间

    # 检查是否提前退出(如用户按特定按键)
    if events["exit_early"]:
        events["exit_early"] = False
        break

    # 1. 获取机器人观测(传感器数据:摄像头图像、关节角度等)
    observation = robot.get_observation()

    # 2. 构建观测帧(符合数据集格式)
    if policy is not None or dataset is not None:
        observation_frame = build_dataset_frame(dataset.features, observation, prefix="observation")

    # 3. 生成动作(策略/遥操作器二选一)
    if policy is not None:
        # 策略生成动作:输入观测帧,输出动作值
        action_values = predict_action(
            observation_frame, policy, device=get_safe_torch_device(...), ...
        )
        # 格式化动作:按机器人动作特征(如关节名称)构建字典
        action = {key: action_values[i].item() for i, key in enumerate(robot.action_features)}
    elif policy is None and isinstance(teleop, Teleoperator):
        # 单遥操作器:直接获取动作
        action = teleop.get_action()
    elif policy is None and isinstance(teleop, list):
        # 多遥操作器:合并机械臂动作和底盘动作
        arm_action = teleop_arm.get_action()  # 机械臂动作
        base_action = robot._from_keyboard_to_base_action(teleop_keyboard.get_action())  # 底盘动作
        action = {**arm_action, **base_action}  # 合并动作

    # 4. 执行动作并记录实际发送的动作(可能因安全限制被裁剪)
    sent_action = robot.send_action(action)

    # 5. 保存数据到数据集(若启用)
    if dataset is not None:
        action_frame = build_dataset_frame(dataset.features, sent_action, prefix="action")  # 动作帧
        frame = {**observation_frame, **action_frame}  # 合并观测与动作
        dataset.add_frame(frame, task=single_task)  # 添加到数据集

    # 6. 可视化数据(若启用)
    if display_data:
        log_rerun_data(observation, action)  # 记录数据用于 Rerun 可视化

    # 7. 维持帧率:等待剩余时间以确保循环周期为 1/FPS 秒
    dt_s = time.perf_counter() - start_loop_t  # 本轮循环耗时
    busy_wait(1 / fps - dt_s)  #  busy 等待以补足时间

    # 更新 episode 已录制时长
    timestamp = time.perf_counter() - start_episode_t
这里分为两种模式,一个是模型推理模式和遥控操作模式,前者是使用大模型进行预测产生动作处理,后者是用于大模型训练采集数据。
对于采集数据模式流程如下:
- 获取观测原始数据:调用robot.get_observation()获取观测数据,包括机器关节的数据、摄像头数据等。用于后续的数据存储。
- 获取遥控机器人的动作数据:调用action = teleop.get_action()获取到动作数据。如果是多遥控操作器,需要将其合并动作。
- 发送机器人执行动作:调用sent_action = robot.send_action(action)执行动作。
- 保存数据集:先调用build_dataset_frame构建遥控臂的数据action,然后将action与从臂机器的观测数据action_values进行合并frame,最后调用dataset.add_frame添加到数据集中。
- 可视化数据:如果启动了可视化数据,调用log_rerun_data记录数据用于rerun可视化。
- 时长更新:录制一轮有一个默认的等待时长,调用busy_wait进行等待。
对于模型推理模式流程如下:
- 获取观测原始数据:调用robot.get_observation()获取观测数据,包括机器关节的数据、摄像头数据等。
- 构建模型输入数据:要能够喂给模型做预测动作,需要将数据转换为模型可接收的格式,调用build_dataset_frame将观测原始数据进行转换。
- 模型生成预测动作:调用predict_action得到预测动作action_values,接着将action_values转换为机器的动作特征action。
- 发送预测动作:调用robot.send_action(action)将预测动作发送给机器进行执行。
下面是observation = robot.get_observation()返回的数据格式,主要包括的是6个舵机关节位置信息+两个相机的图像信息,一共8个键值对。
observation:
{'elbow_flex.pos': 99.54710144927537,
 'fixed': array([[[ 58,  48,  39],
        [ 56,  46,  37],
        [ 49,  39,  29],
        ...,
        ...,
        [ 45,  81,  69],
        [ 54,  87,  76],
        [ 55,  88,  77]]], shape=(480, 640, 3), dtype=uint8),
 'gripper.pos': 2.666666666666667,
 'handeye': array([[[76, 71, 75],
        [75, 70, 74],
        [69, 67, 70],
        ...,
        ...,
        [38, 73, 31],
        [31, 68, 25],
        [26, 63, 20]]], shape=(480, 640, 3), dtype=uint8),
 'shoulder_lift.pos': -98.65771812080537,
 'shoulder_pan.pos': -10.490956072351423,
 'wrist_flex.pos': 54.17743324720067,
 'wrist_roll.pos': -3.5714285714285694}
原始的观测数据,要经过处理,以便喂给模型或者存储到本地,输出的数据如下,一共有3个键值对,包括2个摄像头的键值对和一个舵机关节位置的,可以看到将前面6个舵机的合并为一个键值对了。
observation_frame:
{'observation.images.fixed': array([[[ 80,  55,  61],
        [ 73,  48,  54],
        [ 68,  48,  49],
        ...,
        ...,
        [ 62,  82,  73],
        [ 69,  89,  80],
        [ 73,  90,  82]]], shape=(480, 640, 3), dtype=uint8),
 'observation.images.handeye': array([[[67, 78, 72],
        [72, 83, 77],
        [69, 85, 75],
        ...,
        ...,
        [51, 71, 20],
        [39, 59,  6],
        [42, 63,  7]]], shape=(480, 640, 3), dtype=uint8),
 'observation.state': array([-10.490956 , -98.657715 ,  99.547104 ,  54.177433 ,  -3.5714285,
         2.6666667], dtype=float32)}
发送给机器人的动作数据,比较简单如下,也就是6个舵机的关节位置信息。
sent_action:
{'elbow_flex.pos': 99.63685882886972,
 'gripper.pos': 0.6509357200976403,
 'shoulder_lift.pos': -99.36102236421725,
 'shoulder_pan.pos': -10.0,
 'wrist_flex.pos': 53.53886235345203,
 'wrist_roll.pos': -3.598634095087988}
存储录制数据时,需要遥控机器action_frame、观测机器abservation_frame(前面已经列出了),下面看看相关数据的格式。
action_frame是遥控机器的sent_action转换而来,调用action_frame = build_dataset_frame(dataset.features, sent_action, prefix=”action”),实际上就是将sent_action数据6个键值对改为1个键值对。
action_frame:
{'action': array([-10.       , -99.36102  ,  99.636856 ,  53.538864 ,  -3.598634 ,
         0.6509357], dtype=float32)}
最后将经过处理的一个遥控机器数据和经过处理的观测数据进行合并,最终得到如下4个键值对的数据。
frame:
{'action': array([-10.       , -99.36102  ,  99.636856 ,  53.538864 ,  -3.598634 ,
         0.6509357], dtype=float32),
 'observation.images.fixed': array([[[ 70,  62,  51],
        [ 63,  55,  44],
        [ 61,  54,  44],
        ...,
        ...,
        [ 53,  95,  83],
        [ 47,  90,  80],
        [ 58, 104,  93]]], shape=(480, 640, 3), dtype=uint8),
 'observation.images.handeye': array([[[76, 80, 55],
        [78, 82, 59],
        [77, 79, 57],
        ...,
        ...,
        [52, 64, 18],
        [47, 61, 12],
        [50, 66, 17]]], shape=(480, 640, 3), dtype=uint8),
 'observation.state': array([-10.490956 , -98.657715 ,  99.547104 ,  54.177433 ,  -3.5714285,
         2.6666667], dtype=float32)}
可视化显示
    # 6. 可视化数据(若启用)
    if display_data:
        log_rerun_data(observation, action)  # 记录数据用于 Rerun 可视化
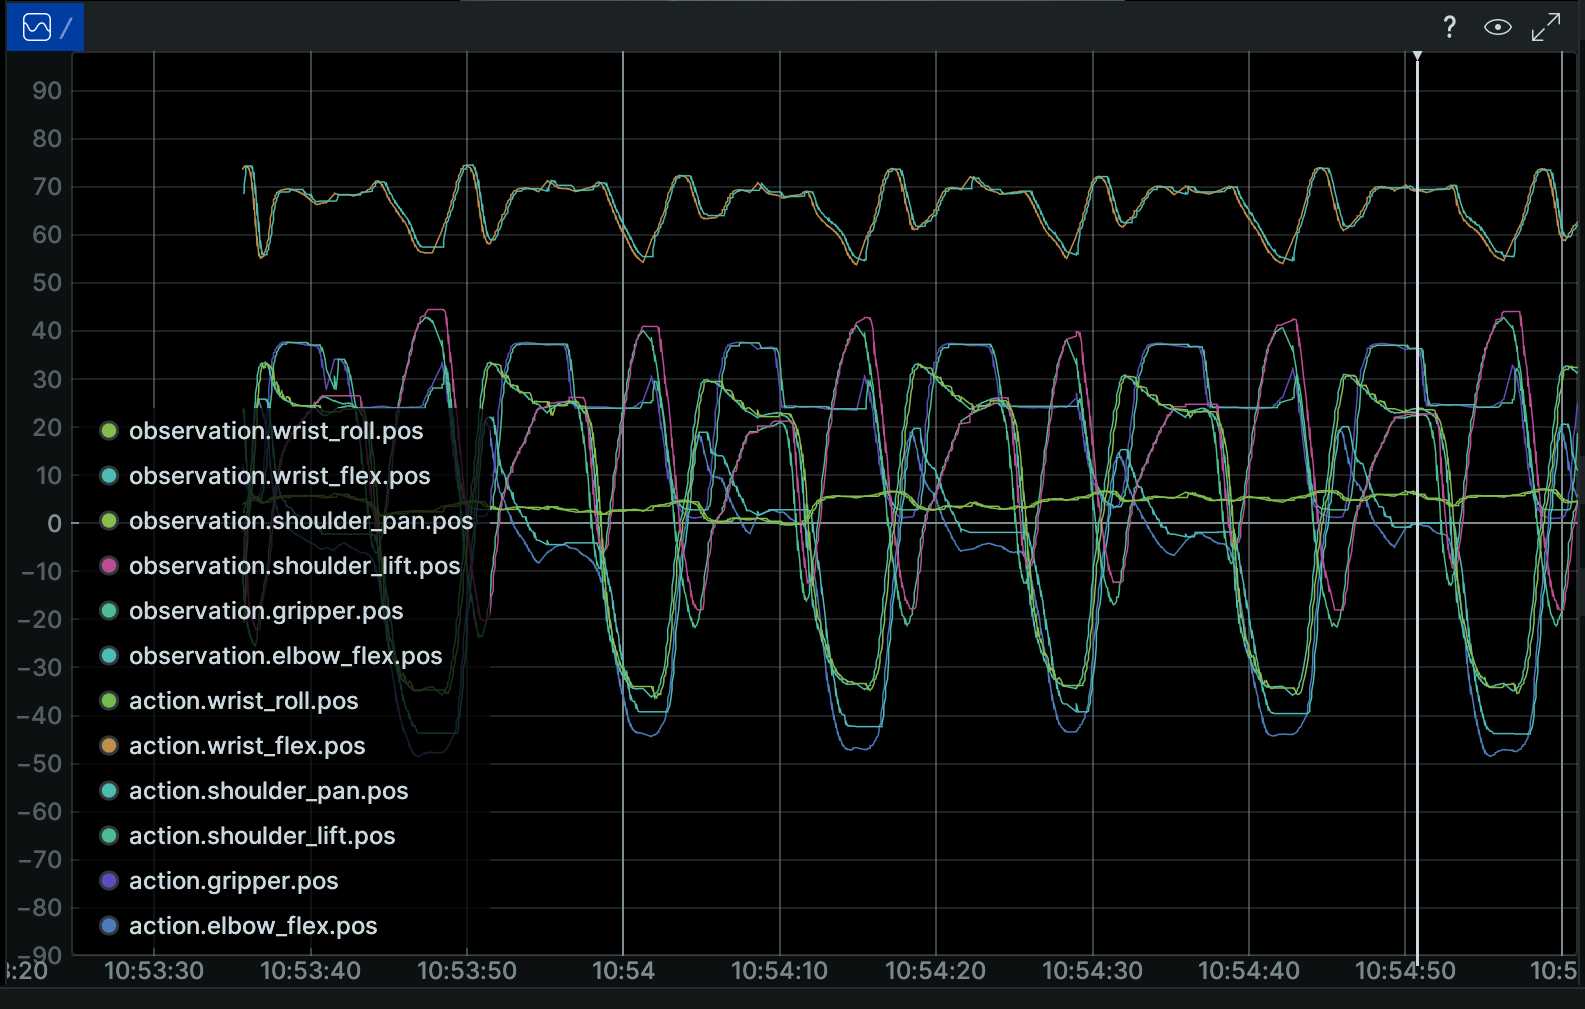
可以看到界面显示的observation.xxx和action.xxx就是调用的这里log_rerun_data函数,理论上来说observation和action要越吻合越好,因为action是模型推理或主臂的动作,observation是实际的动作。
数据存储
在上一节中,循序录制过程中,将经过处理的遥控机器数据action_frame和经过处理后的机器观测数据observation_frame合并得到的数据frame,然后先调用dataset.add_frame(frame, task=single_task)写入,最后调用save_episode方法将缓存数据写入磁盘。
写入缓存
add_frame 是 LeRobotDataset 类的核心方法之一,负责将单帧机器人数据暂存到内存缓冲区(episode_buffer),并对图像数据进行预处理(如格式转换、临时存储)。该方法是数据录制流程中的关键环节,确保每帧数据符合数据集格式要求,并为后续的 save_episode 方法(将缓冲区数据写入磁盘)做准备。
   def add_frame(self, frame: dict, task: str, timestamp: float | None = None) -> None:
        # 1. 数据格式转换PyTorch Tensor → NumPy 数组
        # 目的是统一数据格式为 NumPy 数组(数据集底层存储格式),避免因混合 Tensor/NumPy 类型导致后续处理异常。
        for name in frame:
            if isinstance(frame[name], torch.Tensor):
                frame[name] = frame[name].numpy()

       #2. 数据校验,确保帧格式符合数据集定义
       #检查 frame 中的所有特征(如 observation.state、action)
        #是否与 self.features 中定义的 dtype(数据类型)、shape
        #(维度)一致。例如,若 self.features 定义 action 为
        #float32 且形状为 (6,),则校验 frame["action"] 是否满足这些
        #条件,确保数据规范性。
        validate_frame(frame, self.features)

        #3. 如果没有初始化 episode 缓冲区,则初始化创建
        # 内存缓冲区,用于累积当前 episode 的所有帧数据。结构
        #与 self.features 对应,例如包含 observation.state、
        #action、timestamp 等键,每个键的值为列表(按帧顺序存
        #储数据)
        if self.episode_buffer is None:
            self.episode_buffer = self.create_episode_buffer()

        # 4. 记录帧索引与时间戳
        # 未提供 timestamp,默认按帧率(self.fps)计算相对时间
        #(如 30 FPS 时,第 0 帧为 0s,第 1 帧为 1/30 ≈0.033s),确保时间序列连续性
        frame_index = self.episode_buffer["size"]
        if timestamp is None:
            timestamp = frame_index / self.fps
        # 记录存储frame_index,timestamp,task
        self.episode_buffer["frame_index"].append(frame_index)
        self.episode_buffer["timestamp"].append(timestamp)
        self.episode_buffer["task"].append(task)

        # 5. 添加一帧数据到episode_buffer
        for key in frame:
            if key not in self.features:
                raise ValueError(
                    f"An element of the frame is not in the features. '{key}' not in '{self.features.keys()}'."
                )
           # 如果是图像,处理追加到数据缓冲区
            if self.features[key]["dtype"] in ["image", "video"]:
                img_path = self._get_image_file_path(
                    episode_index=self.episode_buffer["episode_index"], image_key=key, frame_index=frame_index
                )
                if frame_index == 0:
                    img_path.parent.mkdir(parents=True, exist_ok=True)
                #通过 _get_image_file_path 生成标准化路径,调用存储图片,可同步可异步。
                self._save_image(frame[key], img_path)
                self.episode_buffer[key].append(str(img_path))
            else:
            #  如果是动作特征数据直接追加到原始数据缓冲区
                self.episode_buffer[key].append(frame[key])
       #6. 最后更新缓冲区大小
        self.episode_buffer["size"] += 1
add_frame 是机器人数据录制的“数据暂存中枢”,通过内存缓冲区累积帧数据、预处理图像并校验数据格式,为后续持久化存储奠定基础。其设计兼顾了录制效率(异步图像写入)和数据可靠性(格式校验),是构建标准化机器人数据集的核心环节,其设计,总结有以下优点:
- 数据暂存与累积:通过 episode_buffer 在内存中临时存储一整段 episode 的数据,避免频繁磁盘 I/O 影响录制帧率。
- 图像预处理解耦:将图像保存与数据记录分离,支持异步图像写入(AsyncImageWriter),确保主录制循环(record_loop)不受图像存储速度影响,维持稳定帧率。
- 数据一致性校验:通过 validate_frame 提前过滤无效数据,避免错误数据进入后续流程(如 save_episode 写入磁盘)
写入磁盘
录制完一轮,会调用dataset.save_episode()进行存储写入磁盘。
   def save_episode(self, episode_data: dict | None = None) -> None:
        #1. 输入处理与数据校验
        if not episode_data:
            episode_buffer = self.episode_buffer #使用内存缓冲区数据(默认流程)
        #校验缓冲区数据的完整性,确保所有特征(如
        #observation.state、action)的长度一致(与 episode 总帧
        #数匹配),且 episode_index 未超出当前数据集范围
        validate_episode_buffer(episode_buffer, self.meta.total_episodes, self.features)

        # 2.从缓冲区中提取非特征数据(这些键不直接存储到 Parquet)
        episode_length = episode_buffer.pop("size")# 当前 episode 的总帧数
        tasks = episode_buffer.pop("task")# 每帧的任务标签列表(可能重复)
        episode_tasks = list(set(tasks))# 当前 episode 涉及的唯一任务列表
        episode_index = episode_buffer["episode_index"] # 当前 episode 的索引
        #3. 构建全局索引与episode标识,确保每帧在整个数据集中有唯一标识,便于后续数据加载时定位。
        # 生成全局帧索引(从数据集总帧数开始累加)
        episode_buffer["index"] = np.arange(self.meta.total_frames, self.meta.total_frames + episode_length)
        #生成 episode_index 数组(所有帧均属于当前 episode)
        episode_buffer["episode_index"] = np.full((episode_length,), episode_index)

        # 4. 任务标签处理与元数据更新
        # 添加新任务到元数据(若任务不存在)
        for task in episode_tasks:
            task_index = self.meta.get_task_index(task)
            if task_index is None:
                self.meta.add_task(task)# 新增任务并更新 tasks.jsonl

        # 生成 task_index 数组(将每帧的任务标签映射为整数索引)
        episode_buffer["task_index"] = np.array([self.meta.get_task_index(task) for task in tasks])
        # 5.数值特征数据格式化
        for key, ft in self.features.items():
            # 跳过索引类特征、图像和视频(这些由其他逻辑处理)
            if key in ["index", "episode_index", "task_index"] or ft["dtype"] in ["image", "video"]:
                continue
            # 将列表形式的帧数据堆叠为二维数组(shape: [episode_length, feature_dim])
            episode_buffer[key] = np.stack(episode_buffer[key])
          #若 action 特征为长度 6 的向量,episode_buffer["action"]
        # 会从 [ [a0], [a1], ..., [aN] ] 堆叠为 [ [a0_0, ..., a0_5], ..., [aN_0, ..., aN_5] ],符合 Parquet 存储格式。

        #6. 等待异步图像写入完成
        self._wait_image_writer()# 确保所有临时图像文件已写入磁盘
        # 保存数值到Parquet文件
        self._save_episode_table(episode_buffer, episode_index)
        ep_stats = compute_episode_stats(episode_buffer, self.features)
          # _save_episode_table 行为
          #      从缓冲区提取特征数据,构造 datasets.Dataset 对象。
          #      将数据写入 Parquet 文件(路径由元数据的 get_data_file_path 生成,如 data/chunk-000/episode_000000.parquet)。
          #      更新内存中的 hf_dataset(拼接新 episode 数据)。

        #8. 若启用视频模式,将图像编码存储为视频文件
        if len(self.meta.video_keys) > 0:
            video_paths = self.encode_episode_videos(episode_index) # 将临时图像编码为 MP4
    #调用 ffmpeg 将临时目录下的图像帧(如 images/observation.images.laptop/episode_000000/frame_*.png)
    #编码为 MP4 视频,存储路径由元数据的 get_video_file_path 定义
            for key in self.meta.video_keys:
                episode_buffer[key] = video_paths[key] # 记录视频文件路径

        # `meta.save_episode` be executed after encoding the videos

        #9. 更新元数据与校验时间戳
        # 更新元数据(总 episodes、总 frames、chunks 等)
        self.meta.save_episode(episode_index, episode_length, episode_tasks, ep_stats)
        # 校验时间戳连续性(确保帧间隔符合帧率 1/fps ± tolerance_s)
        ep_data_index = get_episode_data_index(self.meta.episodes, [episode_index])
        ep_data_index_np = {k: t.numpy() for k, t in ep_data_index.items()}
        check_timestamps_sync(
            episode_buffer["timestamp"],# 帧时间戳数组
            episode_buffer["episode_index"],# episode 索引数组
            ep_data_index_np,# episode 帧范围
            self.fps,# 帧率
            self.tolerance_s,# 时间容差
        )
       #10. 文件完整性校验与资源清理
       # 验证视频文件数量(每个 episode × 每个视频 key 应对应一个 MP4)
        video_files = list(self.root.rglob("*.mp4"))
        assert len(video_files) == self.num_episodes * len(self.meta.video_keys)
       # 验证 Parquet 文件数量(每个 episode 对应一个 Parquet)
        parquet_files = list(self.root.rglob("*.parquet"))
        assert len(parquet_files) == self.num_episodes

        # 删除临时图像目录(已编码为视频,无需保留)
        img_dir = self.root / "images"
        if img_dir.is_dir():
            shutil.rmtree(self.root / "images")
        # 重置缓冲区,准备下一段 episode 录制
        if not episode_data:  # Reset the buffer
            self.episode_buffer = self.create_episode_buffer()
save_episode 是 LeRobotDataset 类的核心方法,负责将内存缓冲区(episode_buffer)中累积的单段 episode 数据持久化到磁盘,同时更新元数据、生成视频文件、校验数据完整性,并重置缓冲区以准备下一段录制。该方法是数据录制流程的“收尾环节”,确保每段 episode 数据符合 LeRobot 数据集格式规范。主要功能如下:
- 数据持久化:将内存中的帧数据(数值特征、图像路径)写入 Parquet 文件(结构化数据)和 MP4 文件(视频数据)。
- 元数据更新:更新数据集元信息(如总 episode 数、总帧数、任务标签),确保元数据与实际数据一致。
- 数据校验:验证时间戳连续性、文件完整性(如视频/Parquet 文件数量匹配预期),避免无效数据入库。
- 资源清理:删除临时图像文件(已编码为视频),释放内存缓冲区。
save_episode 是 LeRobot 数据集录制的“最终执行者”,通过系统化的数据格式化、编码、校验和清理,将内存中的临时帧数据转化为符合规范的磁盘存储,同时维护元数据一致性和数据完整性。其设计确保了录制数据的可靠性、存储效率和下游可用性,是连接实时录制与离线数据使用的关键桥梁。
结束采集
log_say("Stop recording", cfg.play_sounds, blocking=True)  # 语音提示结束录制
robot.disconnect()  # 断开机器人连接(禁用扭矩,确保安全)
if teleop is not None:
    teleop.disconnect()  # 断开遥操作器连接
if not is_headless() and listener is not None:
    listener.stop()  # 停止键盘监听器
断开设备,停止键盘监听。
if cfg.dataset.push_to_hub:
    dataset.push_to_hub(tags=cfg.dataset.tags, private=cfg.dataset.private)  # 上传数据集到 Hugging Face Hub
将数据上传到hugging Face Hub上。