LeRobot SmolVLA:从训练到推理链路剖析
框架
本文主要对lerobot SmolVLA策略代码进行分析,下面是策略实现关键部分框图。
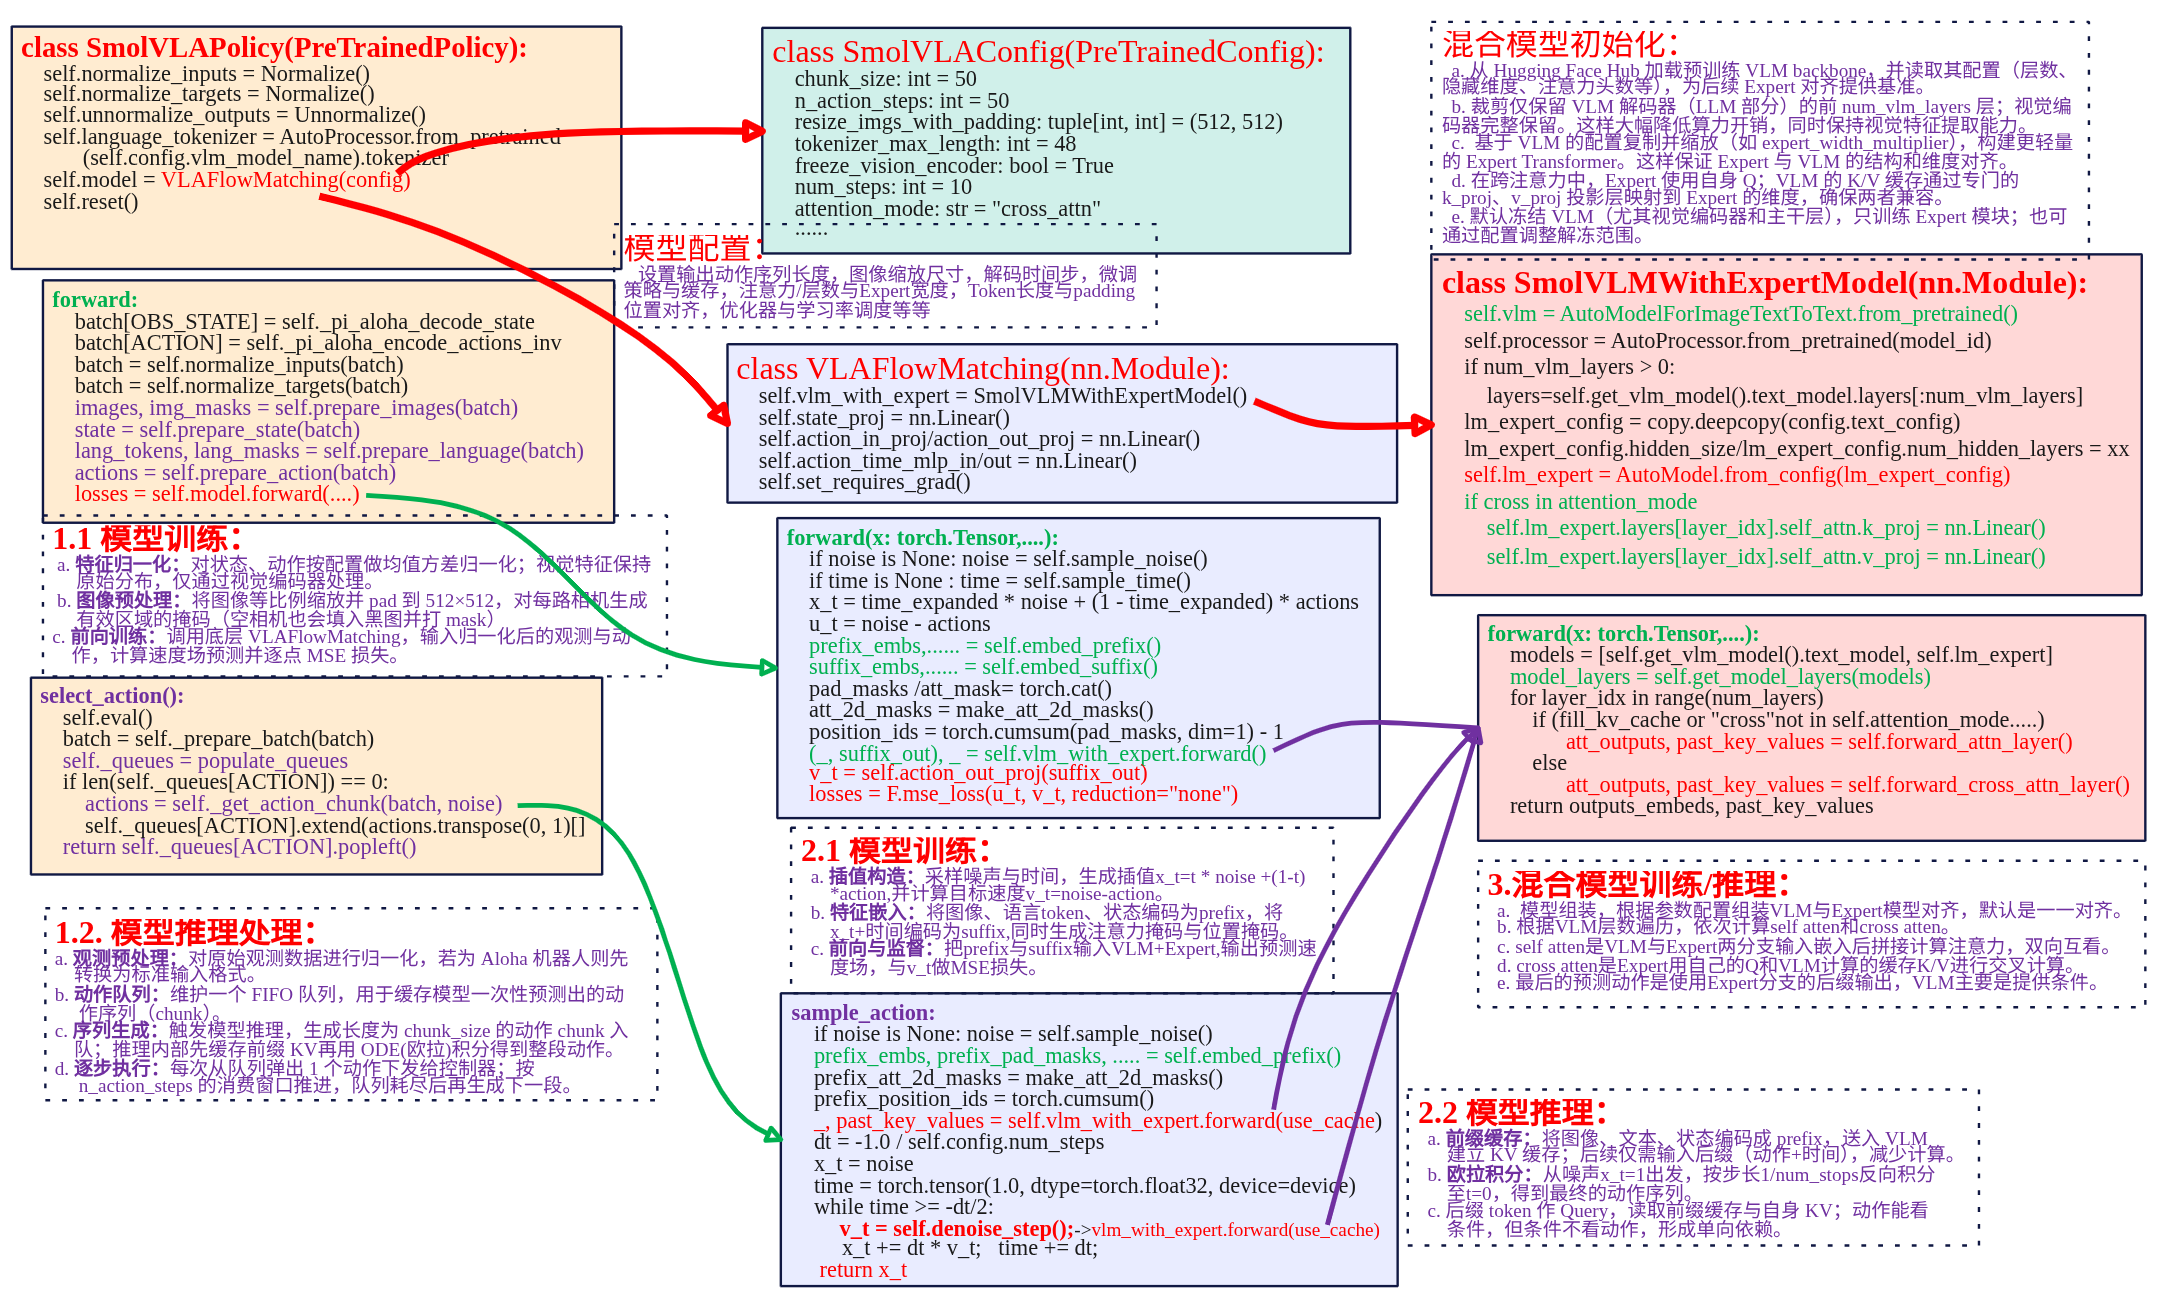
SmolVLAPolicay类封装向上提供策略的调用。SmolVLAConfig是对SmolVLA策略的配置,用于配置输出动作序列长度、观测图像输入后到模型的缩放尺寸以及微调策略等等。SmolVLAPolicay类中关键的成员是VLAFlowMatching类,是实现SmolVLA模型flow matching机制训练、推理的核心。在VLAFlowMatching类中关系成员是SmolVLMWithExpertModel类,其定义了VLM+Expert模型具体实现。
SmolVLA策略实现主要涉及SmolVLAPolicy、VLAFlowMatching
、SmolVLMWithExperModel三个类来实现。就以模型训练、模型推理两条主线来进行总结。
训练
训练过程可以分为一下几个核心部分:
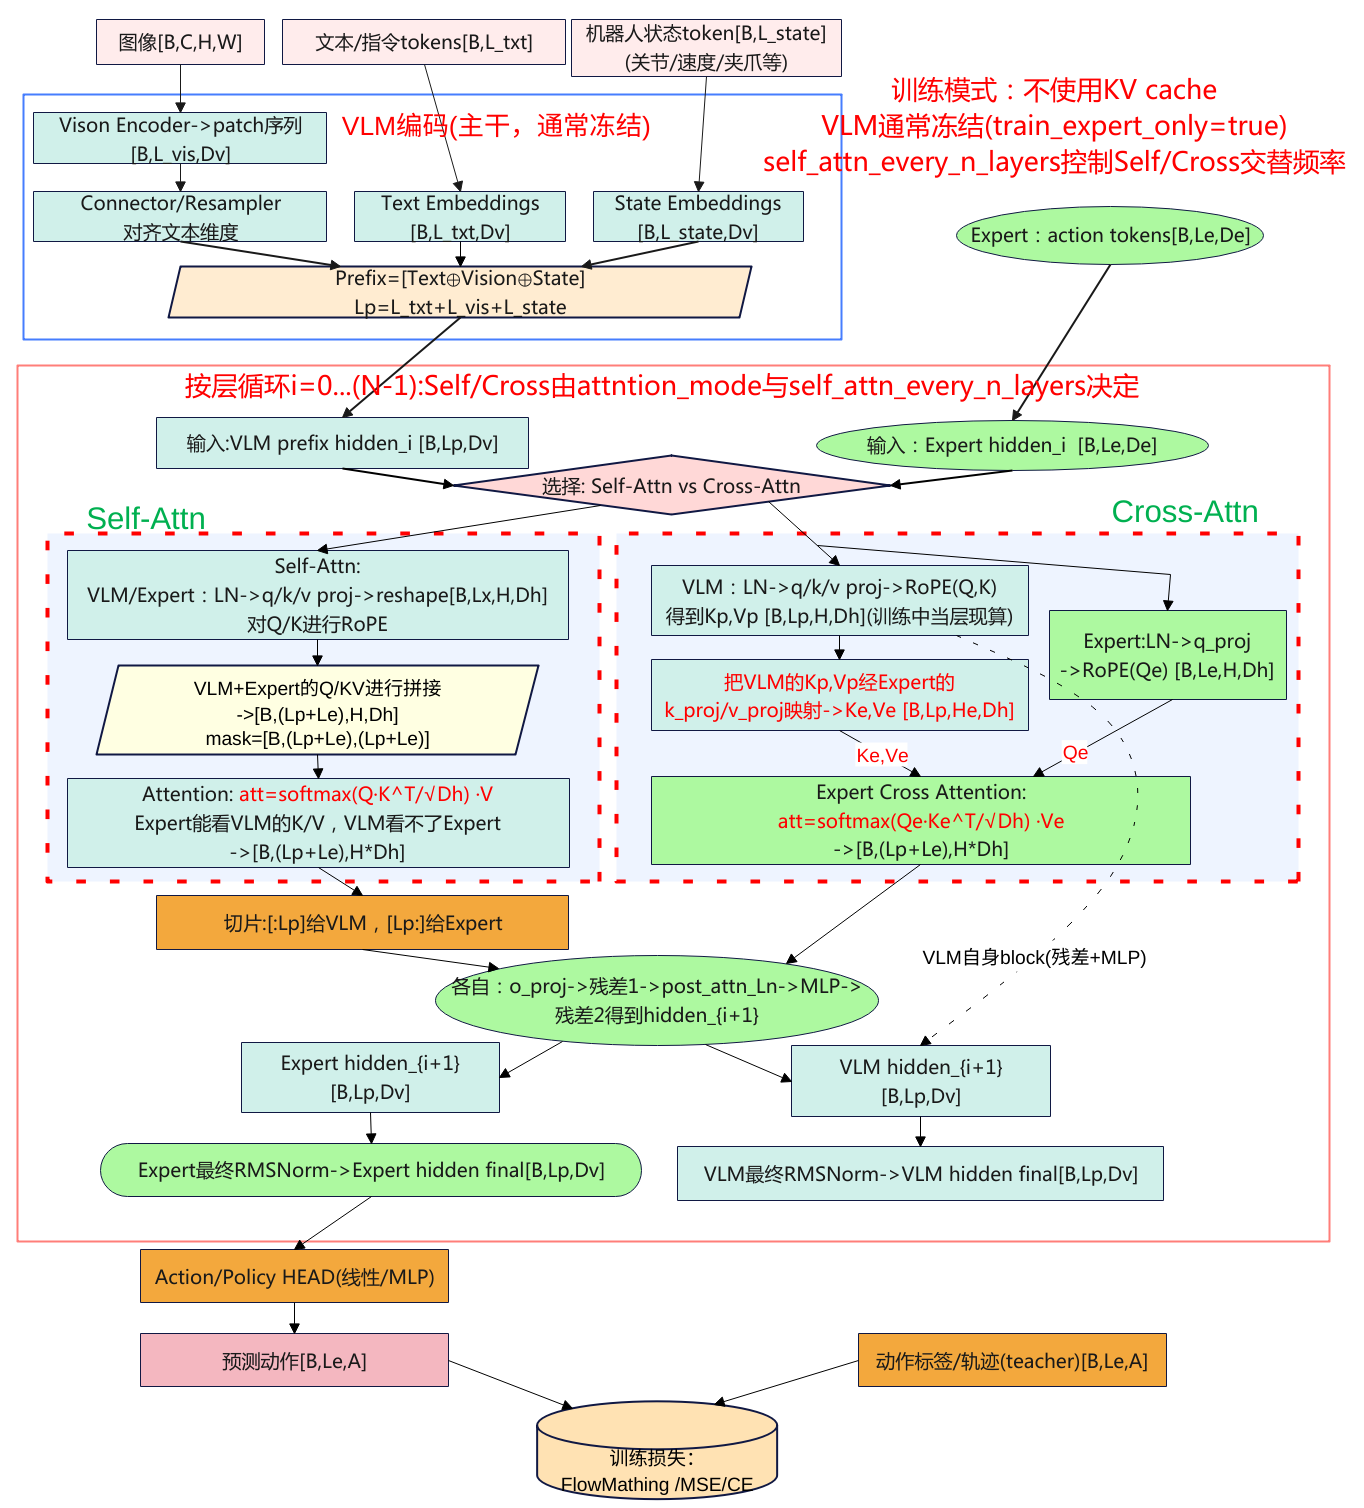
- 数据输入处理:图像、文本和状态通过各自处理方法嵌入并标准化,合并成统一的输入,供后续层次处理。
- VLM与专家模型交互前向传播:图像、文本和状态数据通过VLM和专家模型进行多层次的自注意力和交叉注意力计算,得到联合特征表示。
- 损失计算与优化:通过计算预测动作和目标动作之间的损失,具体是速度场的损失,使用反向传播更新参数。
- 模型参数冻结与训练策略:通过冻结不必要的模型部分(VLM),专注优化重要部分,减少计算的开销。
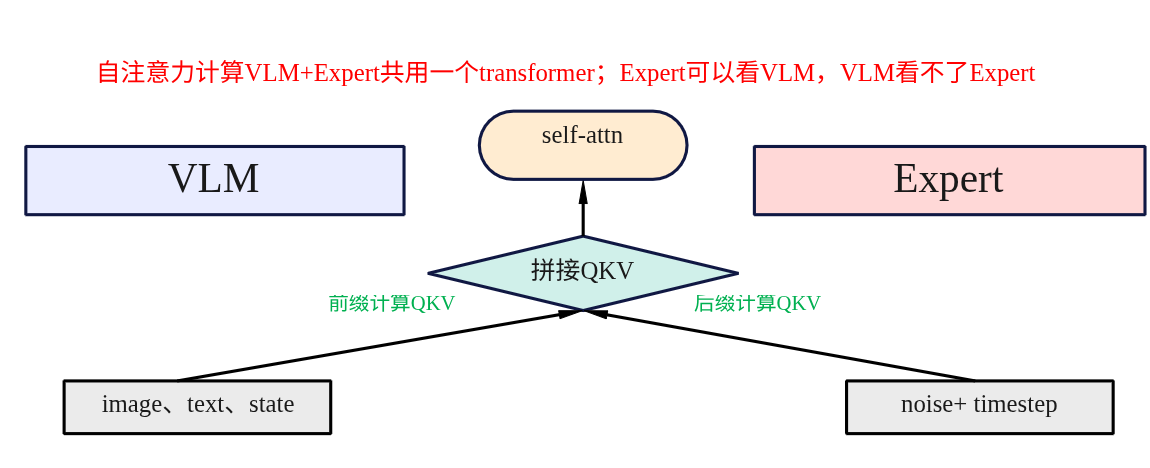
输入处理
SmolVLA模型分为前缀prefix、后缀suffix输入。前缀主要是观测端数据由图像、文本和机器的状态嵌入构成,提供给VLM处理,目的是为模型提供上下文信息,理解任务的背景。后缀是用于生成过程中,输入的是噪声动作+时间步,经过Expert模型处理输出具体的预测动作。
(1)前缀prefix嵌入
def embed_prefix(self, images, img_masks, lang_tokens, lang_masks, state: torch.Tensor = None):
    embs = []
    pad_masks = []
    att_masks = []

    # 处理图像
    for _img_idx, (img, img_mask) in enumerate(zip(images, img_masks)):
        img_emb = self.vlm_with_expert.embed_image(img)
        embs.append(img_emb)
        pad_masks.append(img_mask)

    # 处理语言
    lang_emb = self.vlm_with_expert.embed_language_tokens(lang_tokens)
    embs.append(lang_emb)
    pad_masks.append(lang_masks)

    # 处理状态
    state_emb = self.state_proj(state)
    embs.append(state_emb)
    state_mask = torch.ones_like(state_emb)
    pad_masks.append(state_mask)

    # 合并所有嵌入
    embs = torch.cat(embs, dim=1)
    pad_masks = torch.cat(pad_masks, dim=1)
    att_masks = torch.cat(att_masks, dim=1)

    return embs, pad_masks, att_masks
代码的流程是依次对输入图像、语言、机器状态进行分别做embedding,然后进行按列合并为一个前缀输入。
- 图像嵌入:通过embed_image方法转换为嵌入表示,每个图像的嵌入被添加到embs列表中,img_mask则记录图像的有效区域。
- 文本嵌入:通过embed_language_tokens() 被转换为嵌入表示,lang_emb 是语言的嵌入,包含了语言的语法和语义信息。
- 状态嵌入:状态信息通过 state_proj() 映射到与图像和文本相同维度的空间,得到 state_emb。
最终图像嵌入、文本嵌入和状态嵌入通过 torch.cat() 方法按列合并成一个大的 前缀输入(Prefix)。pad_masks 和 att_masks 也被合并成一个统一的输入,确保每个模态的信息能够与其他模态的输入一起传递。
图像和文本嵌入调用已经隐式包含了位置编码,状态信息state_proj 转换为嵌入,尽管没有显式的位置信息,但会在模型中通过与其他模态嵌入的融合获取上下文信息。
(2)后缀Suffix嵌入
def embed_suffix(self, noisy_actions, timestep):
    embs = []
    pad_masks = []
    att_masks = []

    # 使用 MLP 融合时间步长和动作信息
    action_emb = self.action_in_proj(noisy_actions)
    device = action_emb.device
    bsize = action_emb.shape[0]
    dtype = action_emb.dtype
    # 使用正弦-余弦位置编码生成时间嵌入
    time_emb = create_sinusoidal_pos_embedding(
        timestep,
        self.vlm_with_expert.expert_hidden_size,
        self.config.min_period,
        self.config.max_period,
        device=device,
    )
    time_emb = time_emb.type(dtype=dtype)

    # 将时间嵌入和动作嵌入结合
    time_emb = time_emb[:, None, :].expand_as(action_emb)
    action_time_emb = torch.cat([action_emb, time_emb], dim=2)

    action_time_emb = self.action_time_mlp_in(action_time_emb)
    action_time_emb = F.silu(action_time_emb)  # swish == silu
    action_time_emb = self.action_time_mlp_out(action_time_emb)

    # 将生成的动作嵌入加入到输入中
    embs.append(action_time_emb)

    bsize, action_time_dim = action_time_emb.shape[:2]
    action_time_mask = torch.ones(bsize, action_time_dim, dtype=torch.bool, device=device)
    pad_masks.append(action_time_mask)

    # 设置注意力掩码,防止图像、语言和状态的输入与动作输入相互影响
    att_masks += [1] * self.config.chunk_size
    embs = torch.cat(embs, dim=1)
    pad_masks = torch.cat(pad_masks, dim=1)
    att_masks = torch.tensor(att_masks, dtype=embs.dtype, device=embs.device)
    att_masks = att_masks[None, :].expand(bsize, len(att_masks))

    return embs, pad_masks, att_masks
后缀的输入主要是提供给Expert专家模型用于flow matching预测出输出,输入是噪声动作(noisy actions)+时间步长(timestep)。上述代码可以分为以下几个部分:
- 时间步长嵌入:时间步长(timestep)用于表示当前的生成步骤,生成一个正弦-余弦位置编码(Sine-Cosine Positional Embedding)。create_sinusoidal_pos_embedding() 使用正弦和余弦函数生成时间嵌入,增强模型对时序的理解。
- 动作嵌入:动作通过 action_in_proj 进行嵌入,得到 action_emb。这一步是将生成的动作(采样的噪声动作)转化为嵌入表示。
- 融合时间和动作:动作嵌入与时间嵌入(time_emb)通过 torch.cat() 进行拼接,形成一个新的包含时间信息的动作嵌入。这样,生成的动作不仅包含来自环境的信息,还加入了时间步长的变化。
- MLP处理:合并后的动作嵌入通过 action_time_mlp_in 和 action_time_mlp_out 层进行处理。这个过程是对动作嵌入进行进一步的处理,确保其能够适应后续的生成任务。
最终,生成的动作嵌入被加入到 embs 列表中,并通过 torch.cat() 合并为一个统一的后缀输入。这个后缀输入将与前缀输入一起通过 Transformer 层进行处理。
前向传播
forward是整个前向传播的核心,将将输入组合后通过模型计算输出。
def forward(
    self, images, img_masks, lang_tokens, lang_masks, state, actions, noise=None, time=None
):
    # 1. 前缀输入的生成
    prefix_embs, prefix_pad_masks, prefix_att_masks = self.embed_prefix(
        images, img_masks, lang_tokens, lang_masks, state
    )

    # 2. 后缀输入的生成
    suffix_embs, suffix_pad_masks, suffix_att_masks = self.embed_suffix(actions, time)

    # 3. 拼接前缀和后缀的嵌入
    pad_masks = torch.cat([prefix_pad_masks, suffix_pad_masks], dim=1)
    att_masks = torch.cat([prefix_att_masks, suffix_att_masks], dim=1)

    # 4. 计算注意力掩码
    att_2d_masks = make_att_2d_masks(pad_masks, att_masks)
    position_ids = torch.cumsum(pad_masks, dim=1) - 1

    # 5. 前向计算
    (_, suffix_out), _ = self.vlm_with_expert.forward(
        attention_mask=att_2d_masks,
        position_ids=position_ids,
        past_key_values=None,
        inputs_embeds=[prefix_embs, suffix_embs],
        use_cache=False,
        fill_kv_cache=False,
    )

    # 6. 速度场预测计算损失
    suffix_out = suffix_out[:, -self.config.chunk_size :]
    suffix_out = suffix_out.to(dtype=torch.float32)
    v_t = self.action_out_proj(suffix_out)
    losses = F.mse_loss(v_t, actions, reduction="none")

    return losses
代码调用前缀、后缀输入然后进行拼接得到inputs_embeds,然后再计算注意力的掩码就可以调用VLM+Expert模型进行前向计算。在前向计算中有两个参数use_cache 和 fill_kv_cache 参数,这两个参数的设置控制 key-value 缓存 的使用。
(1)模型组合
models = [self.get_vlm_model().text_model, self.lm_expert]
model_layers = self.get_model_layers(models)


    def get_model_layers(self, models: list) -> list:
        vlm_layers = []
        expert_layers = []
        multiple_of = self.num_vlm_layers // self.num_expert_layers
        for i in range(self.num_vlm_layers):
            if multiple_of > 0 and i > 0 and i % multiple_of != 0:
                expert_layer = None
            else:
                expert_layer_index = i // multiple_of if multiple_of > 0 else i
                expert_layer = models[1].layers[expert_layer_index]
            vlm_layers.append(models[0].layers[i])
            expert_layers.append(expert_layer)
        return [vlm_layers, expert_layers]
模型混合主要是生成一个混合的模型层列表,通过get_model_layers函数计算并返回 VLM 层和 Expert 层的对齐关系,VLM层和Expert层对齐是基于multiple_of来进行层级分配的。如果某些 VLM 层 没有对应的 Expert 层,则设置为 None,仅由 VLM 层处理。默认情况下VLM和Expert的层数一样都为16,下图看看VLM=8,Expert=4的示例。
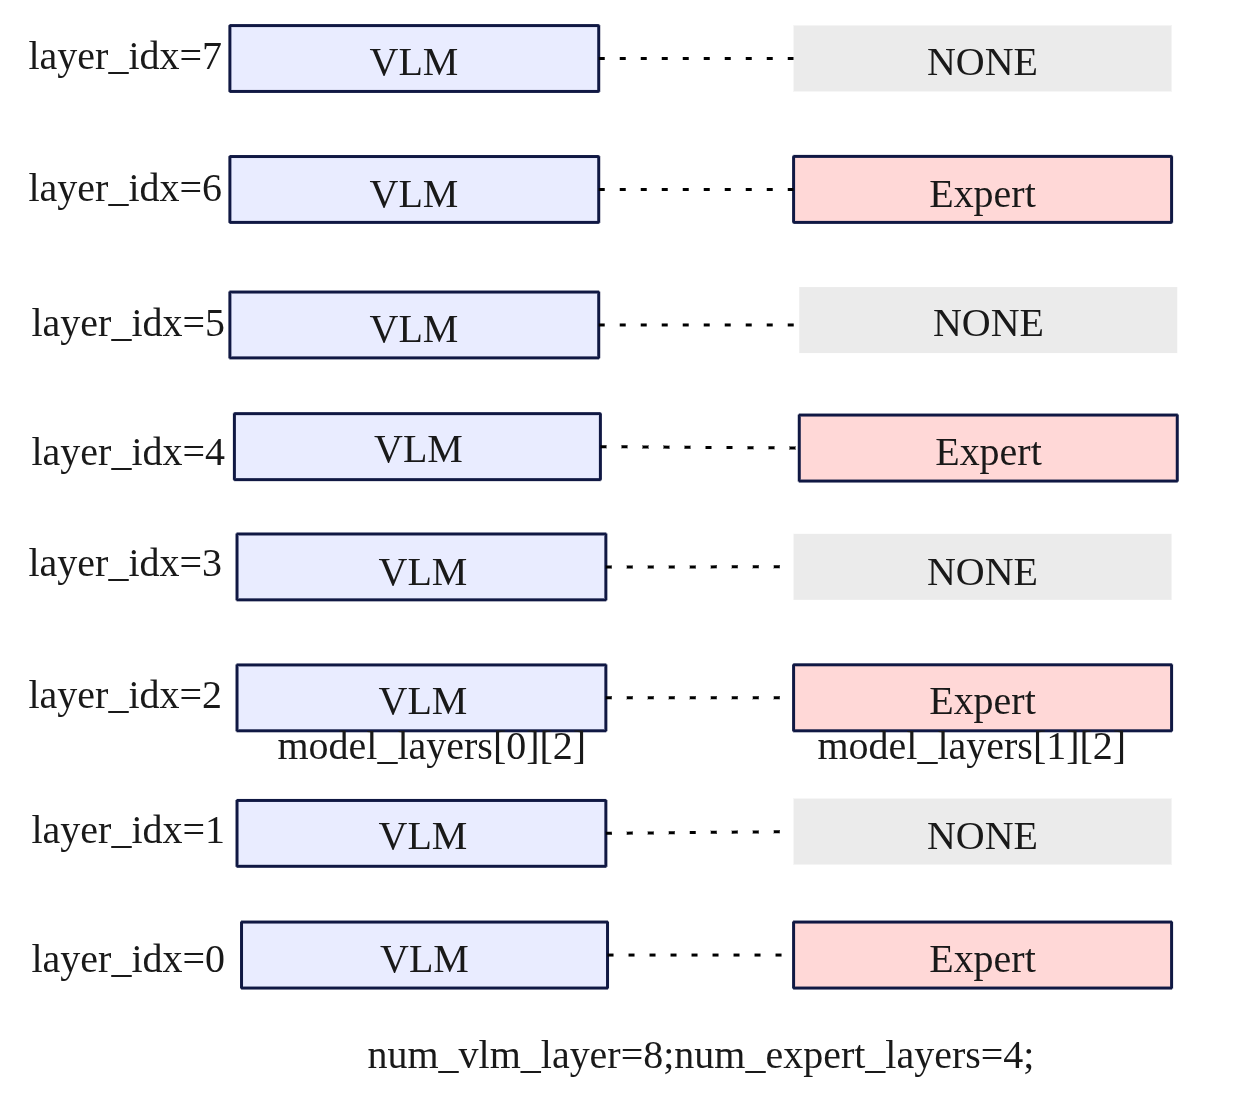
因此最终对于SmolVLA来说,模型是一个混合的模型层列表model_layers。可以通过model_layers[i][layer_idx]来访问具体的模型,model_layers[0][x]为VLM模型,model_layers[1][x]为Expert模型。如model_layers[0][2]为第二层的VLM,model_layers[1][2]为第二层的Expert,model_layers[1][1]为None。
(2)处理输入嵌入
for hidden_states in inputs_embeds:
    if hidden_states is None:
        continue
    batch_size = hidden_states.shape[0]
遍历输入嵌入(inputs_embeds),检查是否有无效的输入(即 None),并获取当前批次的大小batch_size。
- inputs_embeds:模型的输入嵌入数据,可能包含多种模态的输入(例如,图像嵌入、文本嵌入等)。
- hidden_states.shape[0]:获取当前输入数据的批次大小。
(3)自注意力与交叉注意力
        num_layers = self.num_vlm_layers
        head_dim = self.vlm.config.text_config.head_dim
        for layer_idx in range(num_layers):
            if (
                fill_kv_cache
                or "cross" not in self.attention_mode
                or (self.self_attn_every_n_layers > 0 and layer_idx % self.self_attn_every_n_layers == 0)
            ):
                att_outputs, past_key_values = self.forward_attn_layer()
            else:
                att_outputs, past_key_values = self.forward_cross_attn_layer()
使用VLM层数来进行遍历,因为VLM侧的层数是Expert的一倍。进行如循环根据条件来判断是进行自注意力计算还是交叉注意力计算。
判断使用自注意力的条件是有3种情况(其中一种满足即可):
- fill_kv_cache:如果需要填充 键值缓存(key-value cache),则使用自注意力计算。
- “cross” not in self.attention_mode:如果当前没有启用交叉注意力模式,则使用自注意力。
- self_attn_every_n_layers:在每隔 n 层计算自注意力时,执行该条件。通常用于启用跨层的自注意力机制。
具体关于自注意力与交叉注意力计算的细节见后续章节。
(4)残差连接与前馈网络
out_emb += hidden_states
after_first_residual = out_emb.clone()

out_emb = layer.post_attention_layernorm(out_emb)
out_emb = layer.mlp(out_emb)

out_emb += after_first_residual
- 残差连接:每一层都使用残差连接,将当前层的输出与原始输入相加,防止深层网络的梯度消失问题。
-
前馈网络(MLP):通过前馈神经网络(通常包括一个隐藏层和激活函数)进行处理,进一步捕捉输入的非线性关系。
(5)输出处理
outputs_embeds = []
for i, hidden_states in enumerate(inputs_embeds):
    if hidden_states is not None:
        out_emb = models[i].norm(hidden_states)
        outputs_embeds.append(out_emb)
    else:
        outputs_embeds.append(None)
return outputs_embeds, past_key_values
遍历输入嵌入(inputs_embeds),对每个有效的 hidden_states 进行 归一化处理(models[i].norm())。如果嵌入无效(即 None),则直接将 None 放入输出列表中,以保持输入结构的对齐。最终返回 处理后的嵌入 和 past_key_values(如果有的话)。
归一化(通常是层归一化)确保嵌入在后续计算中具有更好的数值稳定性,帮助模型学习。对缺失的嵌入(None)进行特殊处理,主要是VLM+Expert对齐时,Expert通常为VLM的一半,而模型遍历是时按照VLM层次来遍历的,所以有一半的Expert是None,但是这部的None不能在处理VLM层的时候断掉Expert的输入,否则Expert模型梯度链就断了。
损失计算
SmolVLAPolicy.forward(...)
    ......
    调 VLAFlowMatching 计算逐样本/逐步/逐维损失(不聚合)
    losses = self.model.forward(images, img_masks, lang_tokens, lang_masks, state, actions, noise, time)
    if actions_is_pad is not None:
        in_episode_bound = ~actions_is_pad
        losses = losses * in_episode_bound.unsqueeze(-1)

    #  去掉为对齐而pad出的 action 维度
    losses = losses[:, :, : self.config.max_action_dim]

    #  聚合为标量 loss(反向传播用)
    loss = losses.mean()
    return loss, {"loss": loss.item()}
在SmolVLAPolicy.forward(…)调用VLAFlowMatching.forward计算返回损失,下面直接来看VLAFlowMatching.forward。
def forward(self, images, img_masks, lang_tokens, lang_masks, state, actions, noise=None, time=None) -> Tensor:
    # ① 采样噪声与时间
    if noise is None:
        noise = self.sample_noise(actions.shape, actions.device)  # ~N(0,1)
    if time is None:
        time = self.sample_time(actions.shape[0], actions.device) # Beta(1.5,1.0)→偏向 t≈1

    # ② 合成中间点 x_t 与“真向量场” u_t
    time_expanded = time[:, None, None]            # [B,1,1]
    x_t = time_expanded * noise + (1 - time_expanded) * actions    # convex组合
    u_t = noise - actions

    # ③ 前缀/后缀嵌入(图像+文本+状态 | 动作+时间),拼注意力mask/位置id
    prefix_embs, prefix_pad_masks, prefix_att_masks = self.embed_prefix(images, img_masks, lang_tokens, lang_masks, state)
    suffix_embs, suffix_pad_masks, suffix_att_masks = self.embed_suffix(x_t, time)

    pad_masks = torch.cat([prefix_pad_masks, suffix_pad_masks], dim=1)
    att_masks = torch.cat([prefix_att_masks,  suffix_att_masks],  dim=1)
    att_2d_masks = make_att_2d_masks(pad_masks, att_masks)
    position_ids = torch.cumsum(pad_masks, dim=1) - 1

    # ④ 走双塔文本Transformer:prefix + suffix(训练时不建缓存)
    (_, suffix_out), _ = self.vlm_with_expert.forward(
        attention_mask=att_2d_masks,
        position_ids=position_ids,
        past_key_values=None,
        inputs_embeds=[prefix_embs, suffix_embs],
        use_cache=False,
        fill_kv_cache=False,
    )
    suffix_out = suffix_out[:, -self.config.chunk_size :]   # 取后缀对应的输出token

    # ⑤ Expert头→动作向量场 v_t,并与 u_t 做逐元素 MSE
    suffix_out = suffix_out.to(dtype=torch.float32)         # 数值稳定
    v_t = self.action_out_proj(suffix_out)
    losses = F.mse_loss(u_t, v_t, reduction="none")         # [B, T, A] 不聚合
    return losses
核心思想还是学习一个向量场 v_{\theta}(x_t,t) 去逼近真实向量场 u_t = \epsilon – a,其中
x_t = t \cdot \epsilon + (1 – t) \cdot a, \quad \epsilon \sim \mathcal{N}(0,I)
a 是机器真实的动作如舵机的角度,对应上述代码的action;\epsilon是noisy action,最开始随机生成采样而来,对应上述的noise。
模型参数
模型参数冻结主要是以下两个方法决定
- SmolVLMWithExpertModel.set_requires_grad(管 VLM/Expert的大部分参数);
- VLAFlowMatching.set_requires_grad(只管 state 的投影头)。
(1)VLM/Expert大部分参数
def set_requires_grad(self):
    # 1) 冻结视觉编码器(可选)
    if self.freeze_vision_encoder:
        self.get_vlm_model().vision_model.eval()
        for p in self.get_vlm_model().vision_model.parameters():
            p.requires_grad = False

    # 2) 只训练 Expert(常见默认)
    if self.train_expert_only:
        self.vlm.eval()
        for p in self.vlm.parameters():
            p.requires_grad = False
    else:
        # 3) 非“只训 Expert”时,VLM 只冻结一小部分层,避免 DDP unused params
        last_layers = [self.num_vlm_layers - 1]
        if (self.num_vlm_layers != self.num_expert_layers
            and self.num_vlm_layers % self.num_expert_layers == 0):
            last_layers.append(self.num_vlm_layers - 2)

        frozen = ["lm_head", "text_model.model.norm.weight"]
        for L in last_layers:
            frozen.append(f"text_model.model.layers.{L}.")

        for name, p in self.vlm.named_parameters():
            if any(k in name for k in frozen):
                p.requires_grad = False

    # 4) Expert 侧不训练 lm_head(没用到 LM 头)
    for name, p in self.lm_expert.named_parameters():
        if "lm_head" in name:
            p.requires_grad = False
- 冻结视觉编码器:把 VLM 的 vision encoder 切到 eval(),并把其所有参数 requires_grad=False。对于VLM视觉部分已经比较稳定了,若下游数据量不大,继续训练易带来不稳定与显存开销;冻结能省资源并保持视觉表征稳定。
- 只训练 Expert:把VLM的(视觉编码+LLM)都起到eval且全部冻结。这是一种轻量微调策略——只训练 Expert+ 动作/时间/状态投影头,能在小数据上快速稳定收敛,避免对大模型语义分布造成破坏。
- 非“只训 Expert”时,VLM 只冻结一小部分层:永远冻结 VLM 的 lm_head(语言模型头,动作任务用不到),冻结text_model.model.norm.weight,降低训练不稳定,冻结最后 1 层;
总结一下:
| 目标 | 典型设置 | 实际可训练部分 |
|---|---|---|
| 轻量微调(默认/推荐起步) | freeze_vision_encoder=True + train_expert_only=True | Expert 全部层(除 lm_head) + 动作/时间/状态头(VLAFlowMatching 里的 action_in/out_proj、action_time_mlp_、state_proj) |
| 加强表达(部分放开 VLM) | freeze_vision_encoder=True/False + train_expert_only=False | Expert 全部层 + 大多数 VLM 文本层(但冻结 lm_head、末尾 norm、最后 1–2 层) + 动作/时间/状态头 |
除了上面的参数之外在 SmolVLMWithExpertModel.train 中又做了一层保险:
def train(self, mode=True):
    super().train(mode)
    if self.freeze_vision_encoder:
        self.get_vlm_model().vision_model.eval()
    if self.train_expert_only:
        self.vlm.eval()
即使外部调用了 model.train(),被冻的模块仍保持 eval(),避免 Dropout/BN 等训练态行为干扰。是否参与反向仍由 requires_grad 决定;两者配合保证“真冻结”。
(2)state 的投影头
class VLAFlowMatching(nn.Module):
    def __init__(self, config):
        super().__init__()
        self.config = config

        self.vlm_with_expert = SmolVLMWithExpertModel( ... )

        # —— 与动作/状态/时间相关的投影头 ——
        self.state_proj        = nn.Linear(
            self.config.max_state_dim, self.vlm_with_expert.config.text_config.hidden_size
        )
        self.action_in_proj    = nn.Linear(self.config.max_action_dim,  self.vlm_with_expert.expert_hidden_size)
        self.action_out_proj   = nn.Linear(self.vlm_with_expert.expert_hidden_size, self.config.max_action_dim)
        self.action_time_mlp_in  = nn.Linear(self.vlm_with_expert.expert_hidden_size * 2, self.vlm_with_expert.expert_hidden_size)
        self.action_time_mlp_out = nn.Linear(self.vlm_with_expert.expert_hidden_size,     self.vlm_with_expert.expert_hidden_size)

        self.set_requires_grad()   # ← 这里调用

        ...
    def set_requires_grad(self):
        for params in self.state_proj.parameters():
            params.requires_grad = self.config.train_state_proj
根据 config.train_state_proj(布尔值)开/关状态投影层 state_proj 的可训练性。这里只对state_proj做控制,这个是把机器人状态(关节角、抓取开合等)映射到 VLM 文本编码器的隐藏维度。不同机器人/任务,状态分布差异很大(量纲、范围、相关性);是否需要学习这个映射,取决于你的数据规模与分布,所以可以根据train_state_proj=True/False来决定是否要训练或冻结。其它头(action_in/out_proj、action_time_mlp_*)对动作/时间更直接,通常都需要学习,因此默认不在这里冻结。
推理
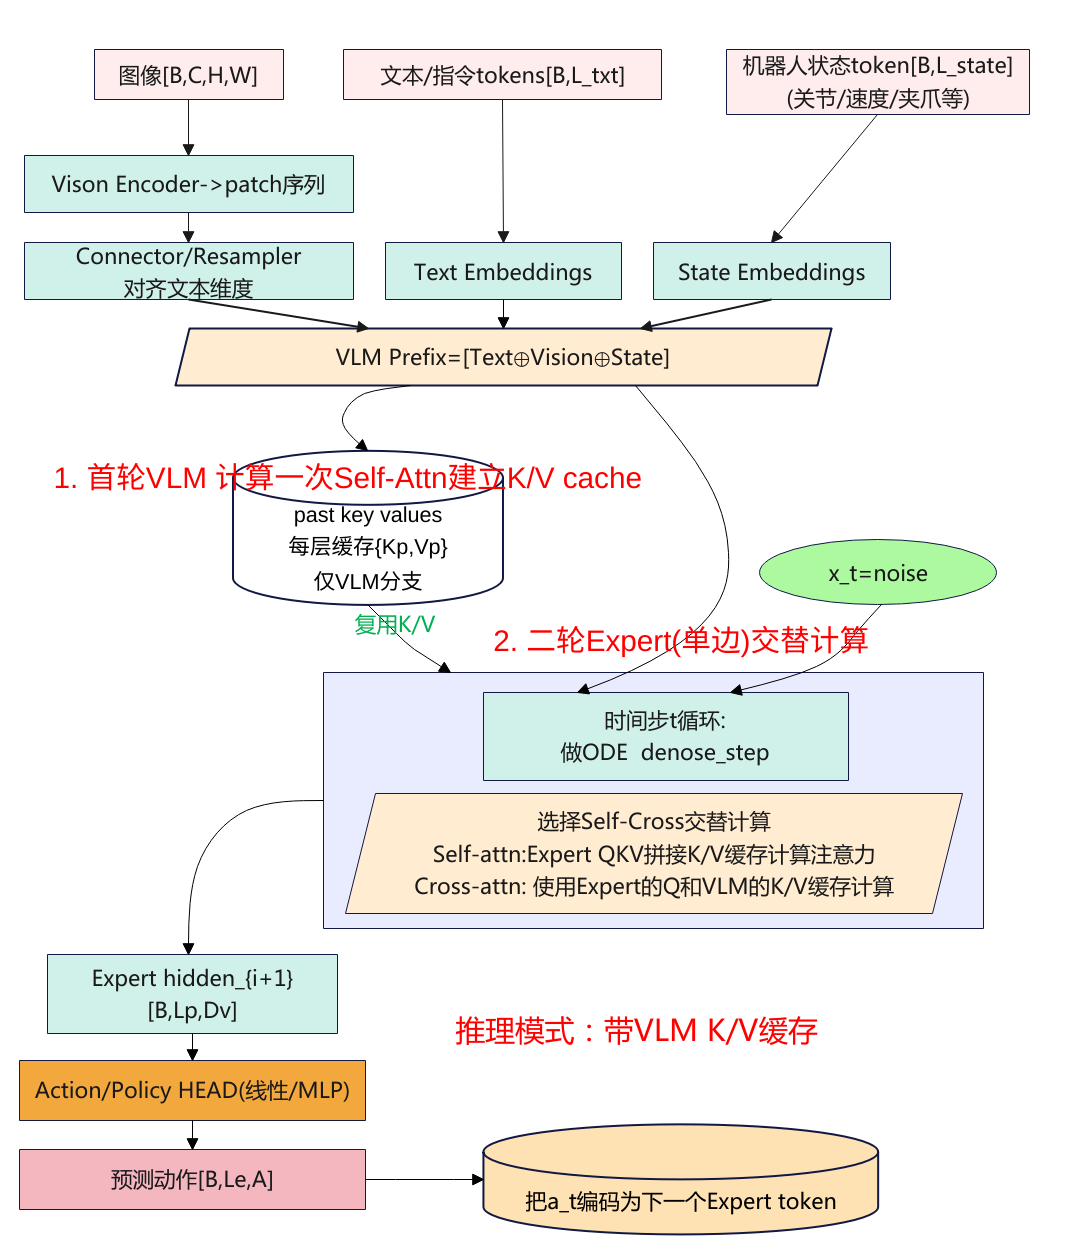
推理的入口函数入口:SmolVLAPolicy.predict_action_chunk ->select_action-> VLAFlowMatching.sample_actions(…),推理跟训练流程大致相同,这里只简单总结一下不同点。
前缀缓存
prefix_embs, prefix_pad_masks, prefix_att_masks = self.embed_prefix(...)
prefix_att_2d_masks = make_att_2d_masks(prefix_pad_masks, prefix_att_masks)
prefix_position_ids  = torch.cumsum(prefix_pad_masks, dim=1) - 1

# 只喂前缀,构建 KV cache
_, past_key_values = self.vlm_with_expert.forward(
    attention_mask=prefix_att_2d_masks,
    position_ids=prefix_position_ids,
    past_key_values=None,
    inputs_embeds=[prefix_embs, None],   # ★ 只有前缀
    use_cache=self.config.use_cache,     # 通常 True
    fill_kv_cache=True,                  # ★ 建缓存
)
与训练的差别是训练不建缓存,推理先把 VLM 的 Q/K/V(更准确:K/V)算出来并存起来(past_key_values),这步只走 self-attn 分支(因为 fill_kv_cache=True),Expert 不参与。另外需要注意的时传递的输入只有prefix_embs而训练是inputs_embeds=[prefix_embs, suffix_embs]既要传递prefix_embs也有传递suffix_embs,这里的后缀编码为插值点的嵌入,即x_t = time_expanded * noise + (1 – time_expanded) * actions。因为没有Expert的输入,所以自注意力算的也只有VLM的输入。
后缀循环
dt   = -1.0 / self.config.num_steps
x_t  = noise  # 初始噪声
time = torch.tensor(1.0, ...)
while time >= -dt/2:
    v_t  = self.denoise_step(prefix_pad_masks, past_key_values, x_t, time)
    x_t += dt * v_t   # Euler 更新
    time += dt
return x_t  # 作为动作
做 ODE 去噪循环(Euler),每一步只算后缀。与训练的差别是“采一个随机 t 直接监督向量场”,推理是“从 t=1 积分到 t=0”(ODE 解)。这里的 num_steps 控制积分步数(精度/速度权衡)。
denoise_step(...)---->

suffix_embs, suffix_pad_masks, suffix_att_masks = self.embed_suffix(x_t, timestep)
# 组装 prefix/suffix 的联合注意力掩码(prefix 只提供 pad_2d 以允许被看)
full_att_2d_masks = torch.cat([prefix_pad_2d_masks, suffix_att_2d_masks], dim=2)
position_ids = prefix_offsets + torch.cumsum(suffix_pad_masks, dim=1) - 1

outputs_embeds, _ = self.vlm_with_expert.forward(
    attention_mask=full_att_2d_masks,
    position_ids=position_ids,
    past_key_values=past_key_values,  # ★ 复用 prefix KV
    inputs_embeds=[None, suffix_embs],# ★ 只有后缀
    use_cache=self.config.use_cache,  # True
    fill_kv_cache=False,              # ★ 不再建缓存
)
suffix_out = outputs_embeds[1][:, -chunk_size:]
v_t        = self.action_out_proj(suffix_out)
denoise_step(…)拿缓存 + 只喂后缀(前缀为None),分层走 cross/self。VLM 不再重算 Q/K/V,层内 cross-attn 时,Expert 的 Query 去看 prefix 的 K/V 缓存;若该层被 self_attn_every_n_layers 强制 self,则只做 Expert 自注意(VLM 旁路,因为没有输入前缀)。与训练的差别是训练时两侧一起算(inputs_embeds=[prefix, suffix]),且无缓存。
训练 vs 推理
| 维度 | 训练(VLAFlowMatching.forward) | 推理(sample_actions + denoise_step) |
|---|---|---|
| 是否用真动作 | 用,参与构造 x_t,t 与 u_t=noise-actions,形成监督 | 不用(没有 label),从噪声解 ODE 得动作 |
| 时间使用 | 随机采样 t~Beta(1.5,1.0),单步监督 | 从 t=1 到 t=0 迭代(步长 dt=-1/num_steps) |
| 是否建 KV Cache | 否(use_cache=False, fill_kv_cache=False) | 是:先prefix-only 建缓存;循环中 suffix-only 复用缓存 |
| 两塔前向喂法 | 一次性 inputs_embeds=[prefix, suffix] | 两段:① [prefix, None](建缓存);② [None, suffix](复用缓存) |
| 层内注意力路由 | 由 attention_mode / self_attn_every_n_layers 决定,但无缓存上下文 | 相同路由;cross 时 Expert-Q × cached VLM-KV;self 时只 Expert 自注意 |
| 位置编码(RoPE) | 每层对参与计算的 Q/K 应用 | 同上;prefix 的位置在建缓存时用过;suffix 在每步都重算 |
| 损失/梯度 | MSE(u_t, v_t) → 反向 | 无损失、无反向 |
| 输出后处理 | 返回标量 loss(policy 中聚合/掩码后) | x_t 作为动作 → unnormalize →(可选)Aloha 映射;支持 n-step 队列 |
注意力
注意力的计算是模型训练和推理的核心,主要涉及自注意力和交叉注意力,这里单独总结一章节进行梳理分析。
自注意力
自注意力的代码注意在forward_attn_layer函数中,接下来根据代码来进行分析。
(1)自注意力QKV计算
query_states = []
key_states = []
value_states = []
首先定义了Self-Attention 中的 Query、Key 和 Value。这些将用于计算注意力权重。
        for i, hidden_states in enumerate(inputs_embeds):
            layer = model_layers[i][layer_idx]
            if hidden_states is None or layer is None:
                continue
            hidden_states = layer.input_layernorm(hidden_states)
inputs_embeds 是一个包含不同模态输入的列表或张量。例如,它可能包含 VLM 的前缀输入(图像、文本、状态)和 Expert 的后缀输入(动作、时间)。enumerate(inputs_embeds) 会遍历 inputs_embeds 中的每个元素,并返回 i(当前元素的索引)和 hidden_states(对应的输入嵌入)。通过 enumerate 我们可以分别处理每个输入模态,i 用来区分是处理 VLM 还是 Expert。i=0 对应 VLM 的输入,i=1 对应 Expert 的输入。
因此model_layers[i][layer_idx]根据 i 来选择当前是处理 VLM 层还是 Expert 层。如果 i=0,则选择 VLM 的层;如果 i=1,则选择 Expert 的层。layer_idx是当前处理的层的索引,指定当前模型中的哪一层进行处理。
当判断hidden_states is None或layer is None是则跳过不处理,对于Expert侧来说会为空,因为外层是按照VLM层数来遍历的,Expert只有VLM的一半,因此每隔VLM一层就会有一个Expert为空。
先使用input_layernorm对当前输入hidden_states进行归一化。然后就各自进行Q/K/V计算。
            hidden_states = hidden_states.to(dtype=layer.self_attn.q_proj.weight.dtype)
            query_state = layer.self_attn.q_proj(hidden_states).view(hidden_shape)
            key_state = layer.self_attn.k_proj(hidden_states).view(hidden_shape)
            value_state = layer.self_attn.v_proj(hidden_states).view(hidden_shape)

            query_states.append(query_state)
            key_states.append(key_state)
            value_states.append(value_state)
在for循环中,遍历VLM和Expert各自计算Q/K/V,然后把VLM和Expert计算的Q/K/V都分类各自加入到相同的列表中,如VLM和Expert的Q加入列表query_states.append。
(2)拼接QKV
query_states = torch.cat(query_states, dim=1)
key_states = torch.cat(key_states, dim=1)
value_states = torch.cat(value_states, dim=1)
将VLM和Expert计算出来的Query、Key、Value各自拼接成一个大的张量,用于后续的注意力计算,从这里可以看出。VLM和Expert的注意力计算是使用一个transformer同时对VLM+Expert的输入拼接输入计算的。相当于VLM和Expert的输入可以双向注意力。
(3)EoPE编码
        seq_len = query_states.shape[1]
        if seq_len < position_ids.shape[1]:
            _position_ids = position_ids[:, :seq_len]
            _attention_mask = attention_mask[:, :seq_len, :seq_len]
        else:
            _position_ids = position_ids
            _attention_mask = attention_mask

        attention_mask_ = _attention_mask
        position_ids_ = _position_ids

        query_states = apply_rope(query_states, position_ids_)
        key_states = apply_rope(key_states, position_ids_)
这段代码主要处理的是位置编码和注意力掩码,这里主要是引入了RoPE编码,计算两个位置之间的相对距离来构造编码,而不是仅仅依赖于绝对位置,提高增强模型的泛化能力。
(4)缓存机制
      if use_cache:
            if fill_kv_cache:
                past_key_values[layer_idx] = {
                    "key_states": key_states,
                    "value_states": value_states,
                }
            else:
                # TODO here, some optimization can be done - similar to a `StaticCache` we can declare the `max_len` before.
                # so we create an empty cache, with just one cuda malloc, and if (in autoregressive case) we reach
                # the max len, then we (for instance) double the cache size. This implementation already exists
                # in `transformers`. (molbap)
                key_states = torch.cat([past_key_values[layer_idx]["key_states"], key_states], dim=1)
                value_states = torch.cat([past_key_values[layer_idx]["value_states"], value_states], dim=1)
将每一层的Key和Value缓存到past_key_values[layer_idx]中,模型训练时这里的use_cache设置为0,当模型是推理时use_cache设置为1,fill_kv_cache设置为1。主要是在推理阶段,会先调用VLM+Expert模型推理一次将Key、Value进行缓存保存起来,后续就只是推理Expert了,VLM将不再计算了,通过这样的方式以提高计算效率。
(5)注意力输出
        att_output = attention_interface(
            attention_mask_, batch_size, head_dim, query_states, key_states, value_states
        )
        return [att_output], past_key_values
注意力计算时会把可用来源(VLM 前缀、Expert 后缀)各自算出的 Q/K/V在序列维度拼接后统一做一次注意力,但掩码保证了“单向可见”,即VLM 与 Expert 的 Q/K/V都参与拼接,但二维掩码使 VLM 基本不看 Expert,Expert 能看 VLM。
交叉注意力
交叉注意力在forward_cross_attn_layer中实现。下面来进行分析。
(1)前缀自注意力
if len(inputs_embeds) == 2 and not past_key_values:
    seq_len = inputs_embeds[0].shape[1]
    position_id, expert_position_id = position_ids[:, :seq_len], position_ids[:, seq_len:]
    prefix_attention_mask = attention_mask[:, :seq_len, :seq_len]

    layer = model_layers[0][layer_idx]          # 选 VLM 的第 layer_idx 层
    hidden_states = layer.input_layernorm(inputs_embeds[0])

    # 投影出 VLM 的 Q/K/V
    query_state = layer.self_attn.q_proj(hidden_states).view(B, Lp, H, Dh)
    key_state   = layer.self_attn.k_proj(hidden_states).view(B, Lp, H, Dh)
    value_state = layer.self_attn.v_proj(hidden_states).view(B, Lp, H, Dh)

    # 对 Q/K 施加 RoPE(相对位置编码)
    query_states = apply_rope(query_state, position_id)
    key_states   = apply_rope(key_state,   position_id)

    # 只在 prefix 上自注意力(用 prefix 的方阵 mask)
    att_output = attention_interface(prefix_attention_mask, batch_size, head_dim,
                                     query_states, key_states, value_state)
    att_outputs.append(att_output)
else:
    expert_position_id = position_ids
当满足inputs_embeds有前缀+后缀的数据且没有缓存的时,只取VLM的输入prefix用于计算自注意力,输出结果为att_outputs。同时如果这层是Expert的交叉注意力,那么VLM计算出来的K/V后面要给到后面Expert用作cross的K/V。
上面前缀自注意力只有只有训练的模型的时候进入交叉注意力每次都会跑,在推理阶段时每次推理只会跑一次。
(2)K/V cache缓存处理
if use_cache and past_key_values is None:
    past_key_values = {}

if use_cache:
    if fill_kv_cache:
        past_key_values[layer_idx] = {"key_states": key_states, "value_states": value_states}
    else:
        key_states   = past_key_values[layer_idx]["key_states"]
        value_states = past_key_values[layer_idx]["value_states"]
推理的时候会用到缓存,在推理时会调用两次forward。
- 建缓存阶段(prefix-only):外层会先单独跑一遍,只给 inputs_embeds=[prefix_embs, None],fill_kv_cache=True,把 VLM prefix 的 K/V 存到 past_key_values[layer_idx]。
- 后缀阶段(真正 cross):用 inputs_embeds=[prefix_embs, suffix_embs] 或者只给 suffix,fill_kv_cache=False,此时直接复用缓存里的 prefix K/V,不用再算。
(3)Expert的交叉注意力
expert_layer = model_layers[1][layer_idx]   # 取 Expert 的第 layer_idx 层(可能是 None)
if expert_layer is not None:
    expert_hidden_states = expert_layer.input_layernorm(inputs_embeds[1])
expert_layer is None 的出现是由 get_model_layers 对齐规则决定的,multiple_of = num_vlm_layers // num_expert_layers。Expert要能够计算交叉注意力也要满足当前层是否有Expert层。因为VLM和Expert是对齐的,不一定每一层都有Expert,而当self_attn_every_n_layers设置为2时,相当于是奇数层才会自注意力,而当VLM为16,Expert为8,那么正好Expert都在偶数层基数层没有,所以整个模型都没有注意力机制计算。
expert_query_state = expert_layer.self_attn.q_proj(expert_hidden_states) \
                         .view(B, Ls, He, Dhe)
# 先把 VLM 的 K/V 合并 head 维,变为 [B, Lp, H*Dh]
_key_states   = key_states.to(dtype=expert_layer.self_attn.k_proj.weight.dtype).view(*key_states.shape[:2], -1)
_value_states = value_states.to(dtype=expert_layer.self_attn.v_proj.weight.dtype).view(*value_states.shape[:2], -1)

# 再喂给 Expert 自己的 k_proj/v_proj,把维度映射到 Expert 的头数与 head_dim
expert_key_states   = expert_layer.self_attn.k_proj(_key_states) \
                         .view(*_key_states.shape[:-1],   -1, expert_layer.self_attn.head_dim)   # [B, Lp, He, Dhe]
expert_value_states = expert_layer.self_attn.v_proj(_value_states) \
                         .view(*_value_states.shape[:-1], -1, expert_layer.self_attn.head_dim)
Expert的expert_query_state来自自己的输入,而expert_key_states、expert_value_states来之与key_states、value_states即为VLM计算过来的缓存K/V。也就是Expert计算注意力是Q使用自己的,而K/V使用的是VLM的。但是需要注意的是可能两边的模型VLM和Expert的hidden宽度、KV头数/维度不一样,先把 VLM K/V 的多头维合并(view(*, H*Dh)),再用 Expert 自己的 k_proj/v_proj 做一次线性变换,映射到 Expert 的多头维度。这就是代码里 “cross K/V 适配层” 的作用;对应到 init,当 attention_mode 包含 “cross” 时,会把 Expert 的 k_proj/v_proj 重定义成输入维=VLM 的 kv_heads x head_dim,输出维=Expert 的。
# 让 Expert 的 token 位置从 0 开始(RoPE 需要相对位置)
expert_position_id = expert_position_id - torch.min(expert_position_id, dim=1, keepdim=True).values

# 行选择 Expert 的 queries(后缀那段),列只到 prefix 的 K/V 长度(严格 cross,不看自己)
expert_attention_mask = attention_mask[:, -inputs_embeds[1].shape[1]:, : expert_key_states.shape[1] ]

# 对 Expert 的 Query 施加 RoPE
expert_query_states = apply_rope(expert_query_state, expert_position_id)

att_output = attention_interface(expert_attention_mask, batch_size, head_dim,
                                 expert_query_states, expert_key_states, expert_value_states)
att_outputs.append(att_output)
接下来就是计算mask,确保Expert计算cross时只看到前缀(纯cross-attn),不能自回看(不看后缀自身)。再计算RoPE的位置编码,最后调用attention_interface计算交叉注意力得到结果输出。
return att_outputs, past_key_values
最终返回的是两个流对应的自注意力输出,att_outputs 的 长度与 inputs_embeds 对齐,索引0代表VLM 流的输出(前面 prefix 自注意力的结果);索引 1 代表Expert 流的输出(本层 cross 的结果;没有 Expert 就是 None)。外层主循环会据此对两个流分别过 o_proj + 残差 + MLP 等,继续下一层。
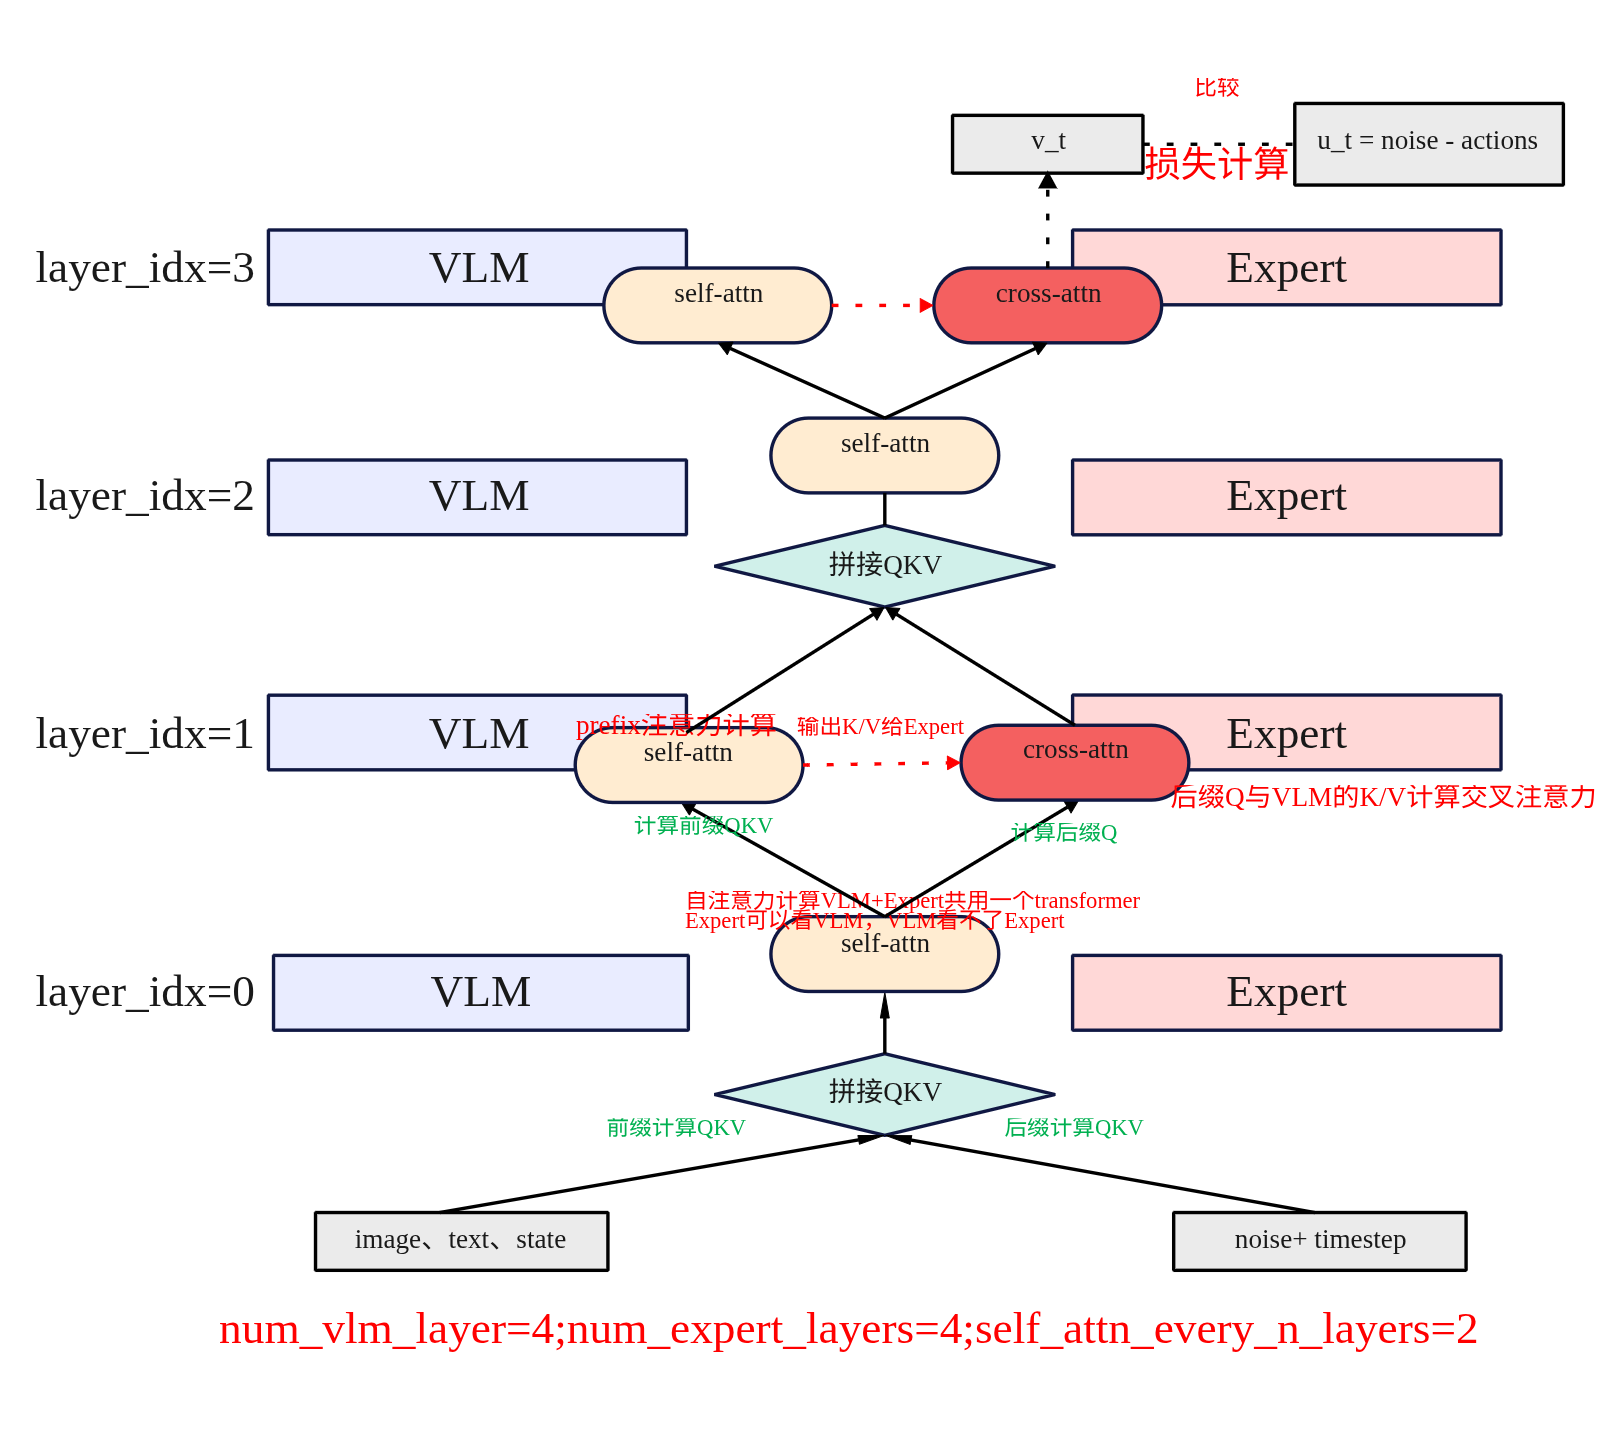
总结一下:cross-attn 分支“不拼接 Expert 的 K/V”:Expert 的 Q 只对 VLM 的 K/V(经投影到 Expert 维度)做注意。训练时VLM K/V现场算出并可选择写入缓存;Expert Q 只看这份 VLM K/V。推理时先用前缀阶段填好 VLM KV 缓存;去噪时 Expert Q 直接用缓存的 VLM K/V。VLM 不产生 Q,不会“看”Expert。
Expert要计算交叉注意力需要满足什么条件?
主要看3个参数
- L = num_vlm_layers:VLM 总层数
- E = num_expert_layers:Expert 总层数(必须 > 0 且能整除 L)
- S = self_attn_every_n_layers:每隔 S 层强制走一次自注意力(=这层不做 cross)
某层做 cross 的条件 : i % M 0 且(S = 0 或 i % S != 0)
举例1:L=16, E=8;有Expert的层是{0,2,4,6,8,10,12,14},若S=2这些层全是S的倍数,那么没有一层做cross。若S=3,做cross的为{2,4,8,10,14}。
总结一下就是能做cross的,先看每隔几层做cross(间接有self_attn_every_n_layers决定)同时要满足能做cross的这几层有没有Expert。一般情况下,当VLM和Expert具有相同层数是,奇数层做Cross,如果Expert为VLM的一半是需要设置self_attn_every_n_layers设置大于2以上的奇数才能做cross。
| 层类型 | 训练时 | 推理时 |
|---|---|---|
| Self-Attn | VLM & Expert 各自算 QKV → 拼接 → 双向注意 → 切分结果 | 同训练,但 prefix KV 在首轮缓存,后续复用;双向依旧存在,但 VLM 冻结 |
| Cross-Attn | VLM 自注意更新自身 KV;Expert 只算 Q,从 VLM KV(线性投影后)读条件 | prefix KV 已缓存;Expert 只算 Q,直接读缓存的 VLM KV;无需重复计算 |
模型配置
SmolVLAConfig
模型配置主要是SmolVLAConfig类,其决定了训练/推理是模型结构、预处理、优化器/调度器、以及VLM骨干选择与冻结策略。
class SmolVLAConfig(PreTrainedConfig):
    # Input / output structure.
    n_obs_steps: int = 1
    chunk_size: int = 50
    n_action_steps: int = 50

    normalization_mapping: dict[str, NormalizationMode] = field(
        default_factory=lambda: {
            "VISUAL": NormalizationMode.IDENTITY,
            "STATE": NormalizationMode.MEAN_STD,
            "ACTION": NormalizationMode.MEAN_STD,
        }
    )

    # Shorter state and action vectors will be padded
    max_state_dim: int = 32
    max_action_dim: int = 32

    # Image preprocessing
    resize_imgs_with_padding: tuple[int, int] = (512, 512)

    # Add empty images. Used by smolvla_aloha_sim which adds the empty
    # left and right wrist cameras in addition to the top camera.
    empty_cameras: int = 0

    # Converts the joint and gripper values from the standard Aloha space to
    # the space used by the pi internal runtime which was used to train the base model.
    adapt_to_pi_aloha: bool = False

    # Converts joint dimensions to deltas with respect to the current state before passing to the model.
    # Gripper dimensions will remain in absolute values.
    use_delta_joint_actions_aloha: bool = False

    # Tokenizer
    tokenizer_max_length: int = 48

    # Decoding
    num_steps: int = 10

    # Attention utils
    use_cache: bool = True

    # Finetuning settings
    freeze_vision_encoder: bool = True
    train_expert_only: bool = True
    train_state_proj: bool = True

    # Training presets
    optimizer_lr: float = 1e-4
    optimizer_betas: tuple[float, float] = (0.9, 0.95)
    optimizer_eps: float = 1e-8
    optimizer_weight_decay: float = 1e-10
    optimizer_grad_clip_norm: float = 10

    scheduler_warmup_steps: int = 1_000
    scheduler_decay_steps: int = 30_000
    scheduler_decay_lr: float = 2.5e-6

    vlm_model_name: str = "HuggingFaceTB/SmolVLM2-500M-Video-Instruct"  # Select the VLM backbone.
    load_vlm_weights: bool = False  # Set to True in case of training the expert from scratch. True when init from pretrained SmolVLA weights

    add_image_special_tokens: bool = False  # Whether to use special image tokens around image features.

    attention_mode: str = "cross_attn"

    prefix_length: int = -1

    pad_language_to: str = "longest"  # "max_length"

    num_expert_layers: int = 8  # Less or equal to 0 is the default where the action expert has the same number of layers of VLM. Otherwise the expert have less layers.
    num_vlm_layers: int = 16  # Number of layers used in the VLM (first num_vlm_layers layers)
    self_attn_every_n_layers: int = 2  # Interleave SA layers each self_attn_every_n_layers
    expert_width_multiplier: float = 0.75  # The action expert hidden size (wrt to the VLM)

    min_period: float = 4e-3  # sensitivity range for the timestep used in sine-cosine positional encoding
    max_period: float = 4.0
可以分为几个部分
(1)输入输出与时序
- n_obs_steps: 输入观测的历史步数,默认为1。
- chunk_size:每次模型生成的动作序列长度(后缀序列长度)。
- n_action_steps:外部消费的动作步数,需要满足n_action_steps <= chunk_size(代码中已校验)。
采样与训练的后缀长度在 VLAFlowMatching.sample_actions/forward 中使用,动作队列在 SmolVLAPolicy 中按 n_action_steps 出队。
(2)归一化与特征维度
- normalization_mapping:各模态的标准化策略,视觉默认 Identity,状态与动作 MeanStd。
- max_state_dim/max_action_dim:状态、动作向量的固定上限维度;短向量会 pad 到该维度(pad_vector)。
Normalize/Unnormalize 与 state_proj/action_ x _proj 的投影维度。
(3)图像预处理与空相机
- resize_imgs_with_padding=(512,512):视觉输入 pad-resize 到固定分辨率,然后再做 [-1,1] 归一化(SigLIP 习惯)。
- empty_cameras:允许在 batch 缺少图像时补空相机占位(用于多摄像头但部分缺失的场景)。
(4)Aloha 相关开关
- adapt_to_pi_aloha:状态/动作与 Aloha 空间的双向转换(关节翻转、夹爪角度/线性空间互转)。
- use_delta_joint_actions_aloha:将关节维度转为相对量(目前未在 LeRobot 中实现,置 True 会报错)。
(5)文本与采样步数
- tokenizer_max_length=48:语言 token 最大长度。
- num_steps=10:Flow Matching 反推理的 Euler 步数(越大越精细,越慢)。
prepare_language、sample_actions 的迭代去噪循环。
(6)缓存与注意力
- use_cache=True:是否使用 KV-Cache(前缀只算一次,后续重复用)。
- attention_mode=”cross_attn”:与 SmolVLMWithExpertModel 的交叉注意力对齐策略。
- prefix_length=-1/pad_language_to=”longest”:前缀长度/语言 padding 策略;用于构造 attention_mask 与 position_ids。
(7)微调的策略
- freeze_vision_encoder=True:冻结 VLM 视觉编码器。
- train_expert_only=True:只训练动作 expert(VLM 其它部分冻结)。
- train_state_proj=True:是否训练状态投影层。
影响SmolVLMWithExpertModel.set_requires_grad 以及 VLM 参数的 requires_grad 设置。
(8)优化器与调度器
- optimizer_* 与 scheduler_*:在训练入口 TrainPipelineConfig.validate() 使用,生成默认的 AdamW + 余弦退火带预热调度。
可被 CLI 覆写(如 –optimizer.lr 等)。
(9)VLM骨干与权重加载
- vlm_model_name=”HuggingFaceTB/SmolVLM2-500M-Video-Instruct”:指定用哪个 VLM 仓库(用于取 tokenizer/processor,和构建骨干结构)。
- load_vlm_weights=False:是否直接从该 VLM 仓库下载骨干权重。为 False时只拿 AutoConfig 构结构,权重随机初始化,随后通常被策略检查点覆盖。为 True时用 AutoModelForImageTextToText.from_pretrained 加载骨干权重(仅在 –policy.type=smolvla 路线下常用)。
与 –policy.path 的关系为用 –policy.path=lerobot/smolvla_base 时,实际权重来自本地/Hub 的策略检查点(包含 VLM+expert),不会使用骨干权重,但仍会用 vlm_model_name 主要是加载 tokenizer/processor。用 –policy.type=smolvla 时,vlm_model_name 决定骨干结构,load_vlm_weights 决定是否拉骨干权重,expert 按本地配置新建训练。
(10)层数与宽度对齐
- num_vlm_layers:把 VLM 的文本层裁剪为前 N 层再用。裁剪层数后设为 self.num_vlm_layers。
- num_expert_layers:专家 expert 模型的层数;若 ≤0 则默认与 VLM 层数相同。决定 expert 与 VLM 的层对齐步长 multiple_of = num_vlm_layers // num_expert_layers。只有在 i % multiple_of = 0 的 VLM 层位点才映射到一个 expert 层用于交叉注意力;其他层的 expert_layer 为空。
- self_attn_every_n_layers:每隔 n 层强制走“仅自注意力”而不是交叉注意力。当 attention_mode 含 “cross” 且 fill_kv_cache=False 时,如果 layer_idx % n = 0 则走 self-attn 分支,否则走 cross-attn 分支。例如n=2 → 偶数层自注意、奇数层尝试交叉注意,但还需该层“有映射到的 expert 层”(见 multiple_of)才真正执行 cross-attn。
- expert_width_multiplier:expert 的隐藏维度 = VLM 隐藏维度 × multiplier(同时重设 FFN 的 intermediate_size)。expert 更窄以降算力;但会改动线性层形状,需与加载的检查点一致,否则会维度不匹配。为实现 cross-attn,代码会按 VLM hidden 尺寸重建部分 q/k/v 投影,使其能接收来自 VLM 的输入(跳过“只自注意”层)。
在SmolVLAConfig配置集中定义了 SmolVLA 的“结构与训练/推理开关”。训练微调常用 –policy.path=lerobot/smolvla_base,此时多数结构参数不宜修改,微调时从smolvla_base中加载config.json配置;而从骨干自建训练时才需要精细调 num_expert_layers/num_vlm_layers/expert_width_multiplier/load_vlm_weights 等,并确保与骨干 hidden_size/层数一致。
加载流程
策略的加载主要分为两条入口路径,两者互斥,通过启动时参数指定。
(1)–policy.path=….方式
用 –policy.path=…..:指定一个已存在的策略checkpoint(Hub 上或本地目录)。如训练时微调可以指定lerobot/smolvla_base,推理时指定output/train/pretrained_model。会从 path/config.json 里反序列化成 SmolVLAConfig;会加载同目录下的 model.safetensors(整个策略权重:VLM骨干 + 动作专家 + 投影层等);训练开始时,模型已经有了一套完整的初始化参数(通常是预训练好的)。
python -m lerobot.scripts.train \
  --policy.path=lerobot/smolvla_base \
  --dataset.repo_id=xxx \
  --batch_size=64 --steps=200000
这里会拿 Hugging Face Hub 上的 lerobot/smolvla_base(含 config.json + model.safetensors,整个策略权重:VLM骨干 + 动作专家 + 投影层等)来初始化。
(2)–policy.type=smolvla方式
指定一个 策略类别(由 @PreTrainedConfig.register_subclass(“smolvla”) 注册)。会创建一个全新的 SmolVLAConfig 对象(带默认超参),而不是加载 checkpoint。没有预训练权重,除非配合 load_vlm_weights=True,这时只会拉取纯VLM背骨的预训练权重(而动作专家层仍然是随机初始化)。可以用命令行参数覆盖任意超参(比如 –policy.num_expert_layers=4)。
python -m lerobot.scripts.train \
  --policy.type=smolvla \
  --dataset.repo_id=xxx \
  --batch_size=64 --steps=200000 \
  --policy.load_vlm_weights=True
从零(或仅用 VLM 预训练骨干)开始训练一个新策略。
下面以推理和训练举例说明其调用流程。
(1)训练使用policy.path方式
在 validate() 中读取 path,并把所有 –policy.xxx 作为“同层覆写”传入配置加载。
policy_path = parser.get_path_arg("policy")
self.policy = PreTrainedConfig.from_pretrained(policy_path, cli_overrides=cli_overrides)
self.policy.pretrained_path = policy_path
判断是从本地目录还是Hub下载获取配置文件,然后应用得到 SmolVLAConfig。只加载“配置”(config.json),不加载模型权重。权重加载发生在后续 policy_cls.from_pretrained(…)(另一个类,见 policies/pretrained.py)。
@classmethod
def from_pretrained(cls, pretrained_name_or_path, *, ..., **policy_kwargs) -> T:
    model_id = str(pretrained_name_or_path)
    # 1) 决定从本地目录还是Hub取配置文件(只取config,不取权重)
    if Path(model_id).is_dir():
        if CONFIG_NAME in os.listdir(model_id):
            config_file = os.path.join(model_id, CONFIG_NAME)
        else:
            print(f"{CONFIG_NAME} not found in {Path(model_id).resolve()}")
    else:
        try:
            config_file = hf_hub_download(repo_id=model_id, filename=CONFIG_NAME, ...)
        except HfHubHTTPError as e:
            raise FileNotFoundError(...) from e

    # 2) 应用CLI覆写(如 --policy.xxx=...)
    cli_overrides = policy_kwargs.pop("cli_overrides", [])
    with draccus.config_type("json"):
        return draccus.parse(cls, config_file, args=cli_overrides)
构建策略,注入数据集特征与统计,若存在 pretrained_path 则连同权重加载。
cfg.input_features/output_features = ...
if cfg.pretrained_path:
    policy = policy_cls.from_pretrained(**kwargs)
else:
    policy = policy_cls(**kwargs)
加载权重(目录或 Hub 的 model.safetensors),随后迁移到 device、设 eval()(训练循环里会再切回 train())。
if os.path.isdir(model_id):
    policy = cls._load_as_safetensor(...)
policy.to(config.device); policy.eval()
SmolVLA 特定初始化,即使走 path,仍按 vlm_model_name 加载 tokenizer/processor(非权重),并实例化骨干+expert。
self.language_tokenizer = AutoProcessor.from_pretrained(self.config.vlm_model_name).tokenizer
self.model = VLAFlowMatching(config)
(2)训练使用policy.type方式
draccus 按类型直接实例化 SmolVLAConfig(该类已注册)并解析 –policy.xxx。
@PreTrainedConfig.register_subclass("smolvla")
class SmolVLAConfig(PreTrainedConfig):
make_policy 同上;因无 pretrained_path,默认从零构建。若配置 load_vlm_weights=true,才会把骨干权重从 vlm_model_name 拉下来(expert 仍需训练)。
if load_vlm_weights:
    self.vlm = AutoModelForImageTextToText.from_pretrained(model_id, ...)
else:
    config = AutoConfig.from_pretrained(model_id)
    self.vlm = SmolVLMForConditionalGeneration(config=config)
(3)推理模式只能使用policy.path方式
policy_path = parser.get_path_arg("policy")
self.policy = PreTrainedConfig.from_pretrained(policy_path, cli_overrides=cli_overrides)
self.policy.pretrained_path = policy_path
record 的配置按policy.path加载训练的模型,随后通过 predict_action/select_action 使用策略进行推理。
policy.path 对比 policy.type
| 维度 | policy.path=… | policy.type=smolvla |
|---|---|---|
| 配置来源 | 从 checkpoint 目录/Hub 仓库里的 config.json 反序列化成 SmolVLAConfig | 通过 @PreTrainedConfig.register_subclass(“smolvla”) 新建一个默认 SmolVLAConfig,命令行可覆写 |
| 权重来源 | 从 checkpoint 里的 model.safetensors 加载完整策略权重(VLM骨干 + 动作专家 + 投影层) | 默认全随机;若 load_vlm_weights=True,则只加载 VLM骨干权重(SmolVLM2),动作专家仍随机 |
| 归一化统计 | 不从 checkpoint 恢复,而是来自数据集 dataset_stats(normalize_inputs/targets在加载时被忽略) | 同左 |
| Tokenizer/Processor | 仍然会用 config.vlm_model_name(默认 HuggingFaceTB/SmolVLM2)加载 tokenizer/processor | 同左 |
| 常见场景 | – 直接推理 – 微调已有策略 |
– 从零开始训练新策略 – 换结构做实验(改 num_expert_layers、expert_width_multiplier等) |
| 推理可用性 | 一键可用(权重完整) | 不可直接用(专家没训练,输出无意义),除非后续手动加载你自己训练好的权重 |
| 是否需要 HuggingFaceTB/SmolVLM2 权重 | 不需要(只用到它的 processor/tokenizer) | 如果 load_vlm_weights=True → 需要拉骨干权重;否则全随机 |
这个跟pi0有啥区别,用lerobot做fine tuning的话,用什么数据集呢?
需要进行遥操采集图像和动作序列,数据格式是lerobot固有的数据格式。
请问您有在lerobot的模拟数据集上训练smolvla成功过吗?我训练一直不收敛
训练过,损失有降下来,数据采集了100基于smovla_base训练后推理的成功率大概在75%左右,但是泛化性不是很好。
感谢分享